Showing posts with label Valentine's Day. Show all posts

Thursday, February 23, 2017

DIY Air Plant Terrariums

Have you heard of air plants?  They are such a fun and unique way to bring a little more green into your life.  With all the winter weather we've been having in central Washington State, I'm so ready for spring.  I'm teaming up with Fairfield World to bring you this project and have been compensated for this post, but all ideas, opinions, and enthusiasm are 100% my own.  This post contains affiliate links.

Air plants don't get planted in dirt. (In fact that would kill them.)  Instead they can be displayed in all sorts of fun ways...anywhere they can get enough natural light.  They get watered about once a week by dipping them in water for a few minutes, let them dry, and then place them back in their home.

You can switch out the color pebbles to match any holiday, decor, or color scheme.  I have Valentine's Day and...

...St. Patrick's Day in mind.


Here's what you'll need to make your own.


You can find my complete instructions for these Air Plant Terrariums on the Fairfield World site here.


Connect with me on...


Pin It

Sunday, January 22, 2017

Valentine's Day Craft Ideas and the Weekly Block Party Link-Up

Did you know that Valentine's Day is just a month away??  It's going to be here before we know it and I'm sure that I will be scrambling to get things down before I know it :).  So to help you stay ahead of the game, here are some great ideas to make for Valentine's Day. 

Sunday, February 7, 2016

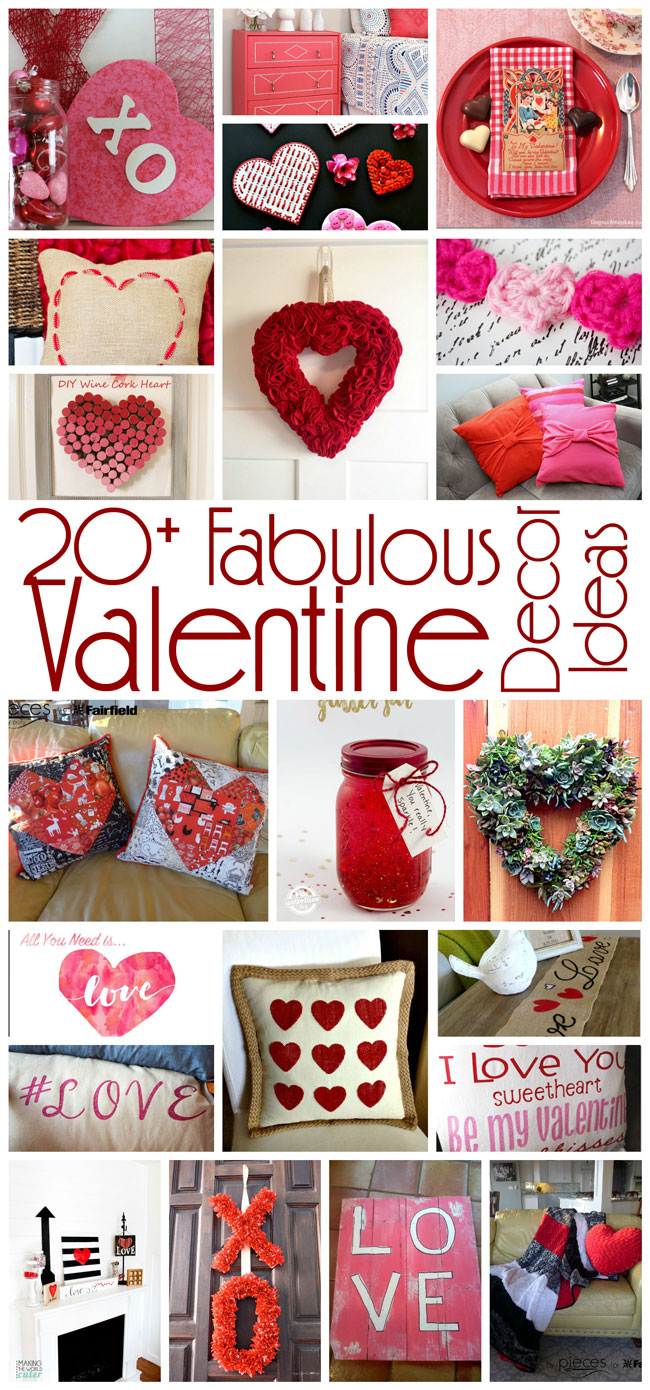
20+ Fabulous Valentine Decor Ideas and the Weekly Block Party Link-Up

Polly, here from Pieces by Polly as your host for this week.  Since working for Fairfield World a year or so ago, I've really fallen in love with pillows and deocr projects, so I thought it would be fun to go with a decor theme this week.   
Hugs and Kisses Valentine Mantel | Ikea Dresser Hack |Valentine Heart Magnets | Valentine's Tablescape Ideas | Burlap and Ribbon Heart Pillow | Wine Cork Heart Wreath | Felt Valentine's Heart Wreath |Crochet Heart Garland | Big Bow Pillows |  Scrappy Heart Quilted Pillows | Valentine Glitter Jar |  Succulent Heart Wreath | Free Valentine's Desktop Wallpapers | Valentine Burlap Heart Pillow | Hashtags Valentine's Pillows | LOVE burlap table runner | Valentine Words Pillow | Valentine's Day Love Garland | Valentine's Day Mantel | Tissue XO Wreath | Pallet Love | Easy Cuddle Heart Pillows and Quilt 


It's time for another Block Party hosted by Making the World Cuter | Rae Gun Ramblings Keeping It Simple Crafts | Pieces By Polly!
I've been really busy the last couple weeks working on some Valentine projects.  You can find them here:
Geeky Chemistry Valentine Art (with Free Cutting Files) | Cuddle Heart Pillows and coordinating Cuddle Quilt with Shannon Fabrics Cudddle | Scrappy Heart Quilted Pillows
This years my Valentine's crafting has been all about the red, white, and black, but in past years I focused more on less traditional colors and themes to we can use our Valentine's projects to add some love year round.  If you're not a fan of red and pink, you might like one of my older posts 14+ Off-Beat Valentine's Tutorials.
http://www.piecesbypolly.com/


Now let's see what you've been up to! Be sure to read over the guidelines…
  • We’d love it if you pinned the Valentine's Decor picture above! :)
  • Link to a specific post, not your home page.
  • Don’t add links to promote giveaways, other link parties or your shops.
  • Visit and comment on at least 2 other links in the party.
  • Don’t link posts you’ve linked before.
  • This party starts Sunday @ 9pm EST and ends Friday @ midnight.
  • By entering a link, you give us permission to feature an image on our blogs. Proper credit and links will always be given.
  • Please link back to whatever blog you are linking from and let your readers know you joined the block party and invite them to do the same!
Connect with me on...


Pin It

Thursday, February 4, 2016

Geeky Valentine's Art - Chemistry STEM Canvases with Metallic OlyFun

Share your love of chemistry and STEM this Valentine's Day with these Easy Geeky Valentine's Art Canvases.

If you think geek as much as I do, you're going to love these are a must make.  My husband and I both majored in chemistry in collage and became chemistry teachers, so chemistry references are right up our alley, so I was really excited when Riley Blake sent me some of this fun chemistry fabric a few months ago.  (It's called Novelty by Becky Marie Designs for Riley Blake).  Fairfield World provided me with the  Oly-Fun™ and Poly-Fil®  and compensated me for this post, but all ideas and opinions are my own.  This post also contains affiliate links for your convenience in locating supplies.

I also got a new Silhouette Cameo for Christmas (thanks in-laws!) and I finally got brave enough to try it out.  Even if you don't have a Silhouette, you can still make this super easy I {Heart} U Canvas without a cutter.

And an extra bonus of this project was I got to go into my husband's classroom and play with all the fun chemistry glassware.

As chemistry teachers we tend to like poking fun at "chemistry" pictures in pop-culture that most of the time they just put colored water into glassware for effect rather than showing "real" chemical in use for an actual experiment...but I might have been guilty myself of just adding red food coloring to water.  Oops!

Quite possibly the only thing  more fun than playing with oversided Erylenmeyer flasks is playing with the teeny tiny glassware.  I do sometimes miss the lab...but maybe not quite enough to return to teaching.

Anyway, you can share your own love of Chemistry this Valentine's Day with this ea
Materials:


Monday, January 25, 2016

Scrappy Heart Pillows - Quilted Pillow with Cuddle Backing

My kids have gotten rather addicted to cuddle fabrics on our throw pillows, so I knew when I sewed these quilted I-Spy Hearts, I wanted to put Cuddle on the back of them, so one side would be super soft.  (Thanks to Fairfield World for providing me with the pillow inserts and compensating me for writing this post and to Shannon Fabrics for providing me with the cuddle fabric.  All opinions are 100% my own.

This tutorial will work to turn any quilted pillow front into a pillow with cuddle backing.

For instructions for sewing the Scrappy Heart Block together, you can see my tutorial here.

Time: 30 minutes to 1 Hour

Level: Beginner

Materials:
  • Quilted Pillow Front
  • 2/3 Yard of Cuddle 3 or Soft Cuddle from Shannon Fabrics in your chosen color.  (I used Soft Cuddle in Scarlet.)  This is enough for 2-3 pillows because it comes 60" wide.
  • 1 - Home Elegance® Pillow (I used a 20" Home Elegance® Pillow with a pillow cover that was 19" finished because I like my pillows extra full.)
  • Zipper 4-5" shorter than the width of your quilt block.  For mine, that was a 16" zipper.
  • Rotary Cutter and Mat or scissors
  • Quilting Ruler or Tape Measure
  • Lots of Pins
  • Coordinating Thread
Directions:

Scrappy Heart Block Tutorial - I-Spy Heart Block

I made a couple of I-Spy quilts featuring hearts a couple years ago. I promised a tutorial, and it kept getting put off.  I figured making some Valentine's pillows would be the perfect opportunity to take pictures for a step-by-step tutorial.  And a big thank you to Fairfield World for providing me with the motivation and compensation for writing this post and providing me with free batting and fusible fleece on an ongoing basis to fuel my creativity and share projects like this with you.  All ideas and opinions are 100% my own.

These blocks are great for making throw pillow, mini quilts, or incorporating into a larger scrappy quilt.


I'm rather addicted to I-Spy squares, but you could use any scrappy squares.  Many quilt shop offer "charm packs" pre-cuts and those would work great too.

This tutorial will teach you how to make the quilt block.  You can go to this post to learn to finish this pillow with cuddle backing and a zipper.

Finished Block Size: Using 4" Charm Squares = 21.5 inches (or 27.5 inches if you use 5" charm squares)

Time: 1 to 1 1/2 hours

Materials: 
  • 30 - 4" background charm squares.  
  • 16 - 4" charm squares for heart
  • 2/3 yard of Smooth Fusible Fleece or your other favorite Fairfield batting if you plan to make a quilted pillow or mini-quilt.  Fusible fleece is my favorite for quilted pillows.  
Directions:

Easy Cuddle Strips Valentine Quilt

When I was making the Cuddle Heart Pillows, I couldn't stop at just pillows, so I made a super simple coordinating Cuddle Strip Quilt.

Cuddle fabric is the perfect fabric for making a large adult-sized throw since it comes 60" wide, and a layer of American Spirit™ Luxury Blend Batting from Fairfield sandwiched inside makes it extra thick and luxurious.  Disclaimer:  Fairfield provided me with the batting and compensated me for writing this post.  Shannon Fabrics provided the cuddle fabrics.  However, all opinions are 100% my own.  I love working for both companies because they offer high quality products that bring out the best in my work.

The front of the quilt uses Rose Cuddle® RedZiggy Soft Cuddle™ BlackMarble Rose Cuddle® in Black/Silver, Lattice Soft Cuddle™ in Snow, and Fancy Puma Soft Cuddle™ Silver/Black with Black Cuddle 3 binding.  For backing we used Soft Cuddle™ in Scarlet, all from Shannon Fabrics.

You can find the full tutorial for this Easy Cuddle Strips Valentine Quilt on the Fairfield site here.

Saturday, January 23, 2016

Cuddle Heart Pillows

These simple Cuddle Heart Pillows are so easy to make, you'll love them as much as we do.  I love the lush softness of the Cuddle Luxe fabrics Shannon Fabrics sent me for this project.  (Disclaimer, Shannon Fabrics provided me with the fabric and Fairfield provided me with the Poly-Fil and compensated me for designing this project.  All opinions are 100% my own.)   The rich textures give a boost to your home decor.  We chose to make ours in Rose Cuddle® in Red and Fancy Puma Soft Cuddle™ in Silver/Black for Valentine’s Day, but they’re so delightful, you'll want to use them year round.


Here's what you'll need to make your own:

For the full set of instructions, you can see my Cuddle Heart Pillow Tutorial on the Fairfield site.

Monday, February 9, 2015

Easy No-Sew Hanging Valentine's Hearts

One more quick Valentine's project for you. My daughter's teacher's reading made a comment to her class that she wished she had more Valentine's decorations, especially to hang from the ceiling.

These fun double sided hanging hearts go together SO FAST and there's no sewing involved, thanks to the great products from Fairfield.  (FYI: Fairfield provided the Stick interlining used and compensates me to share ideas using their products.  The fabric used and all opinions and ideas expressed are my own.  My job writing for them is easy because their stuff rocks and I get to give fun things to my kid's classroom.)


That got our minds working about how we could help her out.  We settled on making a Conversation Heart "LUV 2 READ" Pillow, with the Peanuts fabric on the back, since she's an awesome reading teacher AND she loves the Peanuts characters.  (I just love to indulge people's fandoms, don' you!?!)

We still had plenty of fabric left over, though, which led to these heart hangers.  It probably took me about half an hour to make about a dozen of them.  And now that they're made, they'll last SO much longer than if I'd made them out of paper.

Skill Level: Beginner

Materials:

  • 2 Coordinating Fat Quarters or lots of scraps.
  • 1/2 yard of STIFFEN interlining by Fairfield.
  • 1/2 yard of paper backed fusible web or Stick Interlining by Fairfield
  • Thread
  • Medium to large needle
  • Scissors
  • Iron


Directions:

We're basically going to be making one big sandwich where we layer one fabric, the stiffen, fusible web, and our second fabric.

The Stiffen has one side that is already fusible, so start by ironing your first fabric onto the fusible side of the stiffen.  (The fusible side is the side that feels kinda scratchy to the touch.)


Then iron a sheet of paper-backed fusible web onto the other side of the Stiffen.


Trace heart shapes onto the paper backing.


Cut out.  You'll want to use some sturdy scissors for this.  Cutting stiffen is a little like cutting a light-weight cardboard.

Peel off the paper backing.

Iron the hearts to the BACK side of your second fabric.  Because the Stiffen is so thick, it worked best for me to slip the heart under the fabric, and iron the fabric from the top side, so the heat could reach the fusible web easier.


Cut out your hearts out again.

Use a needle to pull a thread through the top of the heart.  Tie a knot to make a loop.  I made the loops different lengths, so some hearts would hang down farther than others.

I also made some smaller hearts and hung those from the bottom tips of larger hearts to add some variety.

Super fast, and a fun Valentine's addition to the classroom.


Connect with me on...


Pin It