

I'm working on a little outfit for Sweet Pea. I started with a cute onesie that I picked up for half price at Goodwill a month or so ago. I wanted to do something on the leggings to match to bring the outfit together, and was a bit stumped about how to applique thin flower stems onto them. I can't guarantee it's the best way, but I it works great, so I thought I'd share.
I started by cutting out strips of jersey knit that were quite a bit wider than I wanted the finished product to be and layed it all out with my flowers. Notice how the main stem extends beyond the bottom hem. That's was so I could fold it under the hem and not have a raw edge right at the them line.

Then I took the flowers off and pinned it all down well. (I didn't want to use Heat'n Bond since the strips were so thin. I think there are some spray-type adhesives you could use, but I don't own any and are not familiar with them, so I did without.)

Next, I sewed the main step down. I started at the bottom, making sure to sew through the extra that I'd curled under the hem at the same time I sewed the top. Once I got to the top, I turned around and sewed a second line back down, so it would be held on extra well. Also, as I sewed, I removed the pins. With knits it's really hard to pin it down perfectly flat, so there may be a little bubble that you have to adjust. Therefore, you always want to start at the base and work out, so that if your stem ends up extending a bit further, it just makes a longer flower, rather than extending past your main stem.

Then I trimmed my main stem, so it was the width I wanted.


Then I sewed the smaller branches down, starting from the main stem and working my way out to the ends. Then at the ends, I turned around and sewed back to where I'd started. (This picture was taken after I'd sewed the branch once and was on my way back to the beginning.)

I left all the threads delibrately long, so I could pull them through to back and tie them in a knot to secure them, rather than using extra stitching to secure the ends.

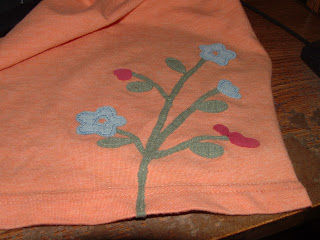
After I'd trimmed each of the branches, this is what I was left with.

Then you can add leaves and flowers to suit your fancy. I used Heat'n Bond lite for those and also used some fray check on the denim flowers. For more info about appliquing knits click here. For info about appliquing fabrics like denim, click here.


I'm really excited to share the tutorial for the leggings with you soon, but I want to make sure I've got all the kinks worked out and it's as good as it deserves to be.
Additional Note: For another example of flower applique, you can see my newer post here.
Additional Note: For another example of flower applique, you can see my newer post here.

Clever you - thanks for a good tip! I'll bet Sweet Pea is excited that you're making an outfit for her.
ReplyDeleteThis applique is my favorite you've done in a while. It's so fresh feeling and makes me want to do something like that on my daughter's clothes. The only question is, which one will fall victim to my scheme?
ReplyDeleteVery cool applique!
ReplyDeleteI have been visiting various blogs for my term papers writing research. I have found your blog to be quite useful. Keep updating your blog with valuable information... Regards
ReplyDeleteLove it! Will be poking around a bit :)
ReplyDeleteThanks for linking at Lucky Star Lane!