

Showing posts with label Attack the Stash. Show all posts
Showing posts with label Attack the Stash. Show all posts
Wednesday, December 14, 2011
Brown Paper Packages Tied up with String...
...and fabric...and felt...and wire...and sewn...and hot glued...

Tuesday, November 29, 2011
Scrappy Wrapping
One thing I'm determined to do better with this year is creative gift wrapping. Typically I leave wrapping until the last minute and just throw some paper around it.

I did do better last year with the stamped cookie cutter wrapping paper we made...until we ran out of it, and I went back to my usual bad habits.

Anyway...This year I've been pinning all sorts of fun and easy looking wrapping ideas on Gift Ideas Board on Pinterest.
I came across this post about wrapping with jean scraps from Rebecca at Older and Wiser on the perfect day. (Rebecca is a genius by the way at creative wrapping. You really should check out her post on 31 Ways to Wrap Your Crap.) I was cleaning out my stash to try to get my craft mess under control because we had family coming to visit. I had already thrown some jeans scraps away...and then went and pulled them back out to make some scrappy bows.
Yeah, yeah...I was supposed to be cleaning and I ended up making bows. There's nothing like cleaning out your craft stash to make you want to work on crafts. And I had this set of burp cloths (tutorial here) I needed to get wrapped up, so they could be delivered...so it was really helping to clean the house, right?
Anyway, I used some denim plus some of the flannel scraps and some other pink scraps I had around to make a coordinating bow.

And a card (You can see my post about these fabric note cards here or see a newer version with text added here.)

I tied the whole bundle up with another denim scrap and sent them off to be delivered.
Saturday, January 22, 2011
Fabric Note Cards with Text - Great Gift Idea

These are similar to the fabric note cards I made last summer, but this time I was a bit more systematic and used the same three fabrics to make a whole matched set. To vary things a bit, though, I used some recycled cards from our wedding in the same color tone and also added some text using some of the super soft transfer paper I bought to make Hubby's belt and the fireman logos for the kids' pajamas.
Tuesday, January 4, 2011
Wedding Quilt - Great Gift Ideas
This was definitely the biggest gift I made for anyone in the family this year.

Thursday, September 30, 2010
Car Color Matching Parking Lot
Every once in a while I see something out there in blog land that triggers an idea that is just so awesome, that it gets pushed right to the top of my to-do list. A few days ago, I discovered ABC and 123 which featured a color matching car parking lot made out of paper from Love and Lollipops.
Anyone who reads my blog regularly knows how much Little Brother LOVES cars, and since colors is one of several themes we're doing in "preschool" I knew this would be perfect. I decided to make ours out of fabric though, because I know my boy...he needed one that would last.

Little Brother didn't recognize it as a parking lot until I told him what it was...

Thursday, April 1, 2010
Spring Cleaning "the Stash"
Happy April Fools' Day! We've got a few tricks up our sleeves for the kids today, but that post will have to come later.
Tuesday, I got the cleaning bug. It was time to get my craft stuff organized again, especially since I'm kind in the Hand-Me-Down Rehab groove and needed to switch out some things in the cabinet to make room for these:

 I bought that stuck of T-shirst for about 60 cents a piece and have enough colorful knits to last me quite a while.


I guess, I'm not the only one thinking of organizing and clearing out their craft stash, because I came across Stash Busting Month on Dollar Store Crafts, via Out of the Crayon Box and I decided to participate, especially since it goes along with the Hand-Me-Down REHAB groove I've been in. I'm even going to be doing a tutorial for Dollar Store Crafts sometime during the month:

Monday morning Hubby let me have the morning to go to Goodwill without the kiddos to do some shopping. I loved working with the knits in Sweet Pea's Very Hungry Caterpillar Applique (tutorial coming tomorrow hopefully) and I've been very inspired by some of the knits projects my sister has done on her blog as well as some I've seen posted on Lil Blue Boo. I wanted to get some T-shirts to use in appliques and other knit projects.
Tuesday, I got the cleaning bug. It was time to get my craft stuff organized again, especially since I'm kind in the Hand-Me-Down Rehab groove and needed to switch out some things in the cabinet to make room for these:


My craft area was so bad, that I couldn't stand it anymore. I should have taken a "before" picture of my craft area, but I didn't. You'll just have to imagine how bad it was if the whole area behind the sewing machine was crammed with stuff.


I have sewing/craft supplies stored in several places thoughout the house, but I try to keep the materials for my current projects mostly in my sewing cupboard. I've found a number of projects (listed in no particular order) that need finishing that will be probably be up on my blog in the next few weeks.
- Christmas presents for my kids' birthmothers
- Fixing the eye spy bags (the plastic windows tore)
- Little girls underwear organizer (I promise this is not as weird as it sounds)
- Firecracker's shirt that needs the sleeves ruffled
- Flannel Pajama Pants for the Kids that were supposed to be for Christmas
- Frog Costume
- Lots more clothes for some Hand-Me-Down Rehab, including some fun boy knee patches, and more denim skirts
- Felt for making a tent out of my daughter's loft bed
- A box of free ties to make into Joseph's Coat of Many Colors for a Primary Lesson and some more of these toddler ties
- A nursing cover for a friend at church
- And the list goes on...
In fact, cleaning up the craft area was so inspirting that I already got #1, 3, and 4 done. I would have finished #6 too, but Firecracker ran off wearing the half-finished costume and I haven't seen it since.
Anything on the list look especially interesting? Let me know and I'll move it up the priority.
Anything on the list look especially interesting? Let me know and I'll move it up the priority.

You want to join in too?
And finally, if you're looking to build your stash, there's a fabric giveaway on my sister's blog.
And finally, if you're looking to build your stash, there's a fabric giveaway on my sister's blog.
Thursday, February 25, 2010
Rescued T-Shirt Flower Applique (Printable Pattern Included!) - Attack the Stash!
Beckie is having a Roadkill Rescue Party going on over at Infarrantly Creative this week. We are all about Roadkill Rescue around here...I would say at least half of the furniture in our house has been given to us as hand-me-downs and a few items were rescued quite literally from right next to the dumpsters in the student housing where we lived before. Problem is, even the ones that are completely UGLY are still waiting to be redone.
So my contribution to the Roadkill Rescue party is the appliqued shirt that went with my daughters' cordoroy tiered skirts.
 I think the tutorial for the skirts would be more interesting---as in I'm still tickled pink that I figured it out and that they are so ADORABLE. (Note: those who know me personally know I'm not really the trendy type, but these skirts turned out super cute anyway.) Anyway, one of the rules is that the item you remake has to be free and even though the pants had holes big enough they were not even worthy of donating to a thrift store...they were not free. I paid for them new once upon a time. Don't worry, though, the tutorial for the skirts really will be coming soon, so stop back by!


So my contribution to the Roadkill Rescue party is the appliqued shirt that went with my daughters' cordoroy tiered skirts.

What was free, though, was the shirt I upcycled for Firecracker to match the skirt. So here is my BEFORE picture:

This Halloween puppy might have been cute once upon a time, but as it was when it was given to us...it's uglier than the worst of my husband's worn out t-shirts. This is what it looked like AFTER:

Not bad, huh? Certainly better than the original.
Here's a quick run down of what I did:
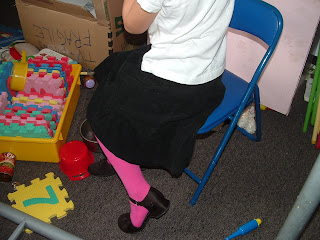
I started by making a petal pattern that I will include at the end here. I just cut and trimmed some paper until I had a shape I liked. Then I cut the shape out of the fabric. (Bright pink to match a pair of hand-me-down tights Firecracker is ALWAYS wanting to wear and that match NONE of her other dresses or skirts.)

They still didn't cover the puppy...

...So I added some black petals from the skirt fabric behind and made a circle for the middle.

Then I pinned everything really well and sewed the black petals on without the pink ones in the way.

Then I pinned...

.... and sewed the pink petals.

When I sewed the petals, I left a long enough tail that I could pull the tails through to the back and tie them in a knot, rather than sewing back and forth to secure them. It just makes your stitching look cleaner.

I did not use any kind of adhesive here because I was out of Heat 'n Bond (Well, I had enough for the Sweet Pea's, but her petals were smaller) and didn't have any Fray Check nd was too excited to get the shirts done. So far the shirts have been washed twice and Firecrackers is still holding up, but I'm more pleased with the result of Sweet's shirt. After washing her, it's frayed just a tiny bit (which I wanted), but the Heat'n Bond seems to be keeping it from fraying any more. To use Heat 'N Bond, you just trace the petal pattern onto the paper backing, cut it out, iron your petal pieces of Heat 'N Bond to the WRONG side of your fabric, cut it out again, peel the back off, and iron onto the fabric. Here is what Sweet Pea's petals looked like ironed onto the fabric before cutting them out.

You can get Heat 'N Bond that's no-sew, but I'm always hesitant to not stitch it. If you use Heat 'N Bond, you won't have to do all the pinning.

Tuesday, February 16, 2010
Announcing Attack the Stash - Join Us!
I've still got more felt food tutorials to share with you. In particular, bread, peanut butter and peanut butter container, and jelly. I've already made these things and just need to write up the tutorials. I also want to try making a few other things...but...
I've been in the mood to do something other than felt food for a while. I know...shocking...since that's mostly what we've been doing on Helping Little Hands the last month. I'll still be doing new felt foods every so often since it's great to have something I can do by hand to. I've also been making a few extras of some things for neices and nephews...and a giveaway we'll have coming up. But making duplicates of things doesn't generate new blog posts...
Anyway, this is a long way of saying, that as we wrap up the daily (or at least a couple-a-weekly) felt food posts, I'm going to have a new focus for the next few weeks...or month...or until whenever I get the itching to try something else crafty.
I have a HUGE pile of clothes and other things I've been saving to remake, repurpose, mend, or reinvent into something different, something cooler, something unique, something recycled. So...
I'm announcing a month or so of Attack the Stash!
You want in? I know you've got your own stash of craft materials that are stuck away in some corner just waiting to be used...maybe you stocked up on felt and need to get started on the felt food...or you've got thrift store finds that need to be prettied up...or you're like me and just can't throw away your old pants even where there are holes...Get them out and get your project done! We'll get a linky party going or if you have a really fun project and want a guest post or highlight post done about it, let me know! I'll get a button sometime soon, but I wanted to throw the idea out there and get everybody thinking.
I'll be doing a lot of ideas for how to repurpose/reinvent/recycle/re-whatever old clothes, but you'll see plenty of other mediums sneaking in too! I'll be making this up as I go along, so I have no idea what all the projects will be.
Here's a sneak peek at what we'll be doing for the first little bit (after I finish the last of the felt food tutorials of course.) You might have seen this project I mentioned last week, where I took a pair of old cordoroy pants (They had holes...way too worn out for DI or Goodwill) and turned them into skirts for my daughters (with two different waistband options)...

 and matching shirts...
 and a scripture tote for Firecracker...
 and patches disguised as appliques for a different pair of pants that almost had holes in the knees...
 and some cards (Yeah...it's there...see the black one...it's one of my primary kid's favorite color)...
 and I still have some (probably about 1 1/2 square feet of fabric) left. At least the zipper is going to go into something else. I just have to figure out what. (Hubby says it's like the Native Americans with buffalo...every part has to be used.) Assuming I figure something out to do with the zipper, I'll be getting seven, YES SEVEN, projects out of this one pair of pants. It's only motivated me more to see what I can make out of some of the other things that have been waiting patiently for a new life. It's also so gratifying to make something (or several somethings) useful and cute out of something that would otherwise be headed to the trash can and landfill. So, the tutorials for these things will be coming up soon!
Who's in? I hope you'll join me! Come back in a few days and grab a button for your blog.
I'm linking to:

I've been in the mood to do something other than felt food for a while. I know...shocking...since that's mostly what we've been doing on Helping Little Hands the last month. I'll still be doing new felt foods every so often since it's great to have something I can do by hand to. I've also been making a few extras of some things for neices and nephews...and a giveaway we'll have coming up. But making duplicates of things doesn't generate new blog posts...
Anyway, this is a long way of saying, that as we wrap up the daily (or at least a couple-a-weekly) felt food posts, I'm going to have a new focus for the next few weeks...or month...or until whenever I get the itching to try something else crafty.
I have a HUGE pile of clothes and other things I've been saving to remake, repurpose, mend, or reinvent into something different, something cooler, something unique, something recycled. So...
I'm announcing a month or so of Attack the Stash!
You want in? I know you've got your own stash of craft materials that are stuck away in some corner just waiting to be used...maybe you stocked up on felt and need to get started on the felt food...or you've got thrift store finds that need to be prettied up...or you're like me and just can't throw away your old pants even where there are holes...Get them out and get your project done! We'll get a linky party going or if you have a really fun project and want a guest post or highlight post done about it, let me know! I'll get a button sometime soon, but I wanted to throw the idea out there and get everybody thinking.
I'll be doing a lot of ideas for how to repurpose/reinvent/recycle/re-whatever old clothes, but you'll see plenty of other mediums sneaking in too! I'll be making this up as I go along, so I have no idea what all the projects will be.
Here's a sneak peek at what we'll be doing for the first little bit (after I finish the last of the felt food tutorials of course.) You might have seen this project I mentioned last week, where I took a pair of old cordoroy pants (They had holes...way too worn out for DI or Goodwill) and turned them into skirts for my daughters (with two different waistband options)...


Who's in? I hope you'll join me! Come back in a few days and grab a button for your blog.
I'm linking to:
Subscribe to:
Posts (Atom)