I've never really been big on decorating for holidays, other than Christmas. We've always lived in such small spaces that I didn't want the extra clutter. I had every intention of leaving our Silent Night painting up until we move sometime around April...but then inspiration struck. The Nativity painting came down and these went up.
I stumbled across this graphic on Remodelholic...
...and I thought...wouldn't that look great with melted crayon dots instead of sprinkles?!? (A little less messy too.)
And I LOVE how it turned out.
I'd planned on doing the whole word LOVE on a piece of wood or something, but when I went hunting around in the garage for something that would work, I found 4 tiles I'd bought over a year ago to make some trivets...and I think they turned out to work perfectly.
I'd also originally thought to use all red/pink/white, but then decided to use a mix of colors so it could be used more of the year. I wish I knew what accent colors I wanted to use in our new living room because I would have used those. The colors turned out so bold and bright that I think when we move, these are going to find a permanent home in the kids' playroom. (I know...I can hardly believe we're finally going to have a playroom...other than our living room.)
I think this technique would also work great to make monograms for the kid's rooms. I love the vivid colors and the texture you get with melted crayon art.
And it's SO easy and uses up some of those old crayons you're sure to have lying around.
Here's what I did...
You'll need to start out gathering your supplies.
- You'll want some kind of backing...tiles, canvas, wood, etc. (If you're using wood, you'll want to paint a base coat of whatever color you want the letters to be.)
- Old crayons...if your house is anything like ours, you've got no shortage of them.
- Candle and matches (I dripped some wax on my candle, so make sure it's not a really pretty one you care about.)
- Template to trace your letters from. I printed my letters off the computer and used "Ariel Black" font with bold added.
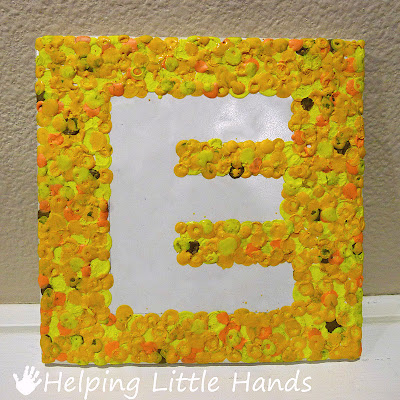
Then I chose a crayon and peeled off the paper. You put the tip in flame of your candle until you see it start to soften and form a drip. This only takes a second or two. Then you touch the tip of the crayon to your tile. Reheat your candle, add another dot, etc.
I used one color and randomly added dots all over the tile, except where I wanted my letter to be.
Then I moved on to a second color, adding dots all over. (I know...it looks a little like I bled all over the tile.)
And you keep building up different colors of crayons until you've covered your tile, except for your letter.
This is with 3 colors. I try to use a mix of dark shades and light shades as I go.
And this is with several more layers added...
and you'll have a little pile of crayon nubs...and a dripped on candle left.
Then repeat for your other letters.
A few things I've learned about melted crayon dot art...the cheap jumbo crayons from the dollar store are awesome to use for these...especially if you use them on your first layer or two. They often come in different (and often lighter shades) than the crayolas (so add some contrast), they're big, so they provide more coverage faster...and of course they're generally crummy to actually color/draw with, so I'm happy to use them up and have them out of the house.
Lighter blue is especially hard to get with the general packs of Crayola, so the light blue you see here was a dollar store jumbo. I also added some purple, silver, and grey for contrast.
I found a glittery green crayon and love the look it gave the V...the lightest green was a dollar store jumbo.
The yellow was the trickiest because it needed to be bold to stand out...and yellow just isn't that bold...but I didn't want it to look orange. I added a little gold for contrast, and some regular yellow. Most of the dots were done with a "dandelion" crayon (which we had a lot of since they come in the 24 crayola packs). I also added some flesh tone to give a little contrast without looking too orange. I'm not super thrilled with the yellow, but taken with the other tiles, it looks great.
Once I do figure out what color the accents in our living room will be at our new house, I'm excited to come up with some more melted crayon letter art.
And if you have a problem with too many old crayons like we do...
...you might be interested in some of our other melted crayon art projects.
And...as luck would have it...the mantel just looked like it was still missing something...something with a little more height...so the next day I came up with this little Valentine Tree.
Please show my sponsors some love...
ELF OWL, 8x10 - From NJoyArt | Fat Quarter Bundle of Joy - From Sisters and Quilters | The True Reason for the Season - Art Print from Prints of Peace |


Very cool! Thanks for sharing!
ReplyDeleteThese melted crayon dots give great color AND texture! Love it!
ReplyDeleteso cool! I think I may have to try this one...
ReplyDeleteOne word of caution (or, perhaps, "over-caution"): We have received many dollar store crayons that were NOT marked as "non-toxic", which gives me pause. Reading up on it, unless "Non-toxic" is printing on the packaging, despite other certifications as art materials that may be listed, there is no guarantee of non-toxicity.
ReplyDeleteSuch a great idea! We have TONS of broken crayons and this would be a perfect way to use them!
ReplyDeletePolly, I love it, love it, LOVE it. You are so good at making a technique so versatile and using it in so many awesome ways. I'm adding this to my to-do list!
ReplyDeleteOh, and I just noticed that the theme for Point of View (a themed blog party kind of thing, if you've never seen it) this month is love. So you should definitely link this up. :) Here are the details: http://www.gwennypenny.com/2011/03/point-of-view-creative-collaboration.html.
DeleteThat is sooooo cool!
DeleteThanks for sharing it!! I'll use it! not sure yet how and when but I will!!!
Way cute! Thanks for letting me know about your great project!
ReplyDeleteOh my heck! I am so making these! I love them!!!
ReplyDeleteI LOVE THIS! And it looks like something my kids could help me make! Thanks for posting this!!
ReplyDeleteWhat a neat idea! Hmmm...we have lots of extra crayons here...
ReplyDeletemakingitfeellikehome.blogspot.com
i "Love" the texture this have - what a fantastic idea!
ReplyDeleteSo awesome! I' going to have to try this! :) Thanks so much for sharing
ReplyDeleteSuper leuk idee,zo kom ik dus van mijn overtollige tegels en krijtjes af.
ReplyDeleteBedankt,ga er een voor een hele lieve vriendin maken.
Warme groet,
Anne.
That is so cute I would love for you to share this at my first linky party this Saturday @CountryMommaCooks.
ReplyDeleteWow- What a neat idea- those look fabulous! We should have a bunch of broken crayons somewhere since I keep buying crayons and we never seem to have any to use... maybe they're hiding out with all of the socks and gloves somewhere!
ReplyDeleteWhat a simply fabulous idea. Love it. As a retired pre-school teacher I have more old, broken crayons than I know what to do with, plus I still have the gallon pickle jar full my sisters and I used as kids. What a sweet memory that would make, as gifts for them.
ReplyDeleteThis is awesome! What a fun idea! I'm definitely going to try this with my kiddos! I found you through Sun Scholars. Thanks for sharing! :)
ReplyDeleteHow fun! I would love it if you would share at our sharing party at http://craftymomsshare.blogspot.com/2012/01/sharing-saturday-2.html. Thank you!
ReplyDeleteThis project is amazing! I'm putting it onto my crafty to do list. Thanks for sharing!
ReplyDeletethis is such a cool idea! love!
ReplyDeleteThis is fantastic!! I would never think of something like this and now my mind is racing with all the different ways you could use this technique! Thanks so much for sharing at my party! Love it!
ReplyDeleteOh this is just fabulous! What a great take on the "melted crayon craze" that's burning through blogland! I'd be thrilled if you'd come and share this at the Head to Head Showdown, going on right now at www.icantstopcrafting.blogspot.com ~Jen
ReplyDeleteNice! I like this technique! Turned out great!
ReplyDeleteFABULOUS prject and great tutorial too. Will definitely be trying this!
ReplyDeleteThanks for sharing
Lowri
http://papervinenz.blogspot.com/
Just featured you on my Sunday Spotlight post! http://www.aturtleslifeforme.com/2012/01/sunday-spotlights.html
ReplyDeleteVery cute idea, looks great!
ReplyDeleteThis is SO great!! LOVE LOVE LOVE THIS!
ReplyDeletePamela @ pbjstories.com
I love the bold look of this project...what a GREAT idea! Thanks for sharing it! :0)
ReplyDeleteGreat project ... would love for yout o come link up some of your posts http://www.getouttamyheadplease.com/2012/01/link-party-show-it-off-7.html
ReplyDeleteYou are brilliant! I'm so excited to try this!!!
ReplyDeleteI LOVE love love this idea! I'm going to pin it and try sometime!
ReplyDeleteI would love if you came over and linked this project to my weekly Round Tuit party at:
http://jembellish.blogspot.com/
Have a great week!
Jill @ Creating my way to Success
Wonderful idea!
ReplyDeleteOh that is AMAZING!!!! and looks like it took a lot of patience.... But CERTAINLY worth it... It came out Beautiful!!
ReplyDeleteThese look incredible - and I loved your other melted crayon pieces as well. I am certainly going to have to give this a try...
ReplyDeleteGreat site to learn crafts to teach my grands. I'm a new follower.
ReplyDeleteSo once the end of the crayon is soft and melty you just dabbed it onto the tile? So great!
ReplyDeleteLOVE LOVE LOVE this! my kids arnt old enough to do this activity so i might have to have a mommy craft night to do it myself!! thanks for sharing!
ReplyDeleteThis is so adorable. I love the way you just dripped the crayons!
ReplyDeleteI love this, can't stop looking at it! I featured it in tomorrow's newest A Crafty Soiree, thanks for joining us!
ReplyDeleteThese look amazing! I think it's one of the best crayon crafts I've seen so far. Will definitely need to do this in the future.
ReplyDeleteI love Love LOVE these!!! So perfect for Valentine's Day and with the fun rainbow colors I wouldn't have to put them away after the 14th!
ReplyDeleteSuch a great idea! they are lovely, really wonderful!!!
ReplyDeleteRobyn @ Pen Pals & Picture Books
Thank you for sharing! I did this over the weekend and love how it turned out buti was wondering if you put something over it to seal it?
ReplyDeleteI'm so glad you tried it! I didn't do anything to seal it...just left it as it was.
DeleteBrilliant, simply brilliant.
ReplyDeletePolly, I featured your LOVE art on this week's Terrific Under Ten Tuesday!
ReplyDeletehttp://athomewithk.blogspot.com/2012/01/terrific-under-ten-tuesday-48.html
I just did this project on Monday. I did my alma matter and school colors. I loved how it turned out!
ReplyDeleteHi Polly! I love this project. I just wanted to let you know I featured it from our Point of View link party! So glad you linked up.
ReplyDeletexoxo,
Amy
http://amerooniedesigns.blogspot.com/2012/02/point-of-view-features-and-feb-theme.html
This is so great! Thanks for the step by step directions...I am SO doing this soon!
ReplyDeleteGreat idea. I second that Megan
ReplyDeleteI have been so proud of my self fr using the twistable crayons, and now I see all of these activities to do with old crayons
ReplyDeleteThis is fabulous. Of course I have crayons all over the house. I try to keep them from melting in my purse, where I keep a few for when I'm out with restless grandchildren. I will be featuring this activity, with a link back to you, on my Frugal Friday activities with grandchildren feature next week, at newgrandmas.com and plan to do it when my granddaughter next visits. I love your site!
ReplyDeleteWonderful idea! At first I was having trouble with the lighter colors getting the burned black look, but then realized if I just held it close to the flame (not in the flame) it still melted and without the black. I will be using this technique with a group of middle school kids tomorrow. Wish me luck!
ReplyDeleteThis is wonderful! I have been looking for fun ideas to decorate the nursery, we have a little boy on his way in August! I think this would be wonderful to do his name, or a phrase of some sort...
ReplyDeleteThis is the neatest idea I have seen in a long time, I have been looking for something different to do and I just found it thank you for sharing. THIS IS AWSOME
ReplyDeleteMelted crayons are the jam these days, aren't they?! This is a great idea, I mean what you did with letters is really cute, but the method itself is so versatile, you could do so much with it. Thanks for sharing, I love your color schemes, by the way. Nice work, and great pics too :)
ReplyDeleteOh how I love this!! I have a piece of canvas art with a very plain white background that I wanted to fill in, but the other crayon projects (melted crayon + hairdryer) would overwhelm the main picture. This would be perfect. And I love your yellow piece!! xx
ReplyDeleteI LOVE this! I am trying it now, and am having trouble getting the crayon to stick. It sticks at first, but then as it dries, much of it starts falling off. Can you tell me what kind of tile you used? My husband said the shiny/glossy kind would not work good, so I got something a little rougher, more of a matte finish. However, maybe the shiny, glossy White finish is the best way to go. If you can help me, it would be much appreciated. I need to finish this in the next few days, it is a gift, yikes! Thanks!!
ReplyDeleteAleisha, The finish on the tiles I used was kind of a matte finish. Beyond that, I don't have any other info about them. I bought the at the Habitat for Humanity RE-Store a couple years ago, so it was just whatever tile they had in at the time. Sorry I can't be more help. :/
DeleteHi, loved your crayon art work. I tried it out yesterday on Canvas 3X3 that i got from walmart and it came out very well. Have been admiring it from the time I finished it. I made one with my daughter's name and now i am going to make another one with my son's name and few others as birthday gifts for my friends kids.
DeleteAleisha, if not tile, try it out on Canvas. It works !
Hi Polly! Well, I am starting over with a 6X6 tile. By any chance can you email me a template for the letter R? I am having trouble making my own ;) My email is aleishatap@aol.com
ReplyDeleteThank you so much!
This is so pretty. I just love all the texture ........... really nice work. Thank you.
ReplyDeleteI'm having trouble getting the right look. I put the crayon over the flame and it melts but when I put the crayon on my piece of wood i only get a lumpy dot about a millimeter in diameter. Please HELP!
ReplyDeleteI found you need to work pretty quickly and remelt the tip between each dot. Hope that helps! If not, you can email me directly with more specifics.
DeleteThanks for the help!
DeleteHi! I found your tutorial on this about a month ago and I'm finally, FINALLY done with my own version! ;) This project is surprisingly time consuming, yeah? Especially since I did SIX 11x14 canvases (I totally bit off more than I could chew with that one).
ReplyDeletehttp://www.hotmesshostess.com/2012/07/different-spin-on-melted-crayon-art.html
I linked to your posts on the melted crayon letter art and the melted crayon pointillism.
What did you use to finish your tiles? I can't seem to find anything that will finish the wax of crayons...
ReplyDeleteLoved this idea and made some of my own saying "laugh" but can't hang them until they are finished!!
I'm not sure what you mean by finishing them. I just made the wax drops and then propped them up on my mantel. I will be putting them in my kids' playroom soon though and will probably use some of the 3-M sticking strips.
ReplyDeleteThis was a fun and easy craft! I did this with my 12 year old daughter and her friend for a rainy afternoon activity. They each chose to do the initial of their first name. I didn't have tile, so I used 6"x6" pieces of cardboard and lined the front with white paper so the colors would "pop". They found outlining the letter to be the hardest part since you have to have a steady hand and be careful not to drip wax drops onto the inner part of the letter. Once it's outlined, filling the surrounding area is pretty much foolproof. The only "problem" we encountered was having to relight the candle every few minutes due to the liquid wax accumulating and burning out the wick. Aside from that, it was fun and creative and it was an hour and a half less time that they spent watching tv or using electronics!!! lol! ;) Thanks for such a great idea!
ReplyDeleteI love this idea and I will try it even without a letter to go in the middle. It just gives a very unique abstract textured look to art and I love this look! Thank You so very much for sharing this one!
ReplyDeleteThanks for sharing your crayon idea with us! I love the textured look and the abstract feel of this project!I am going to make this project without the space with the letter in the middle because it's going to make a pretty of an show piece!
ReplyDeleteI love this : )
ReplyDeleteAwesome! would be cute to do a child's name for their room!
ReplyDeletethanks for sharing!