
***Note: The actual quilt pictured below is
Since publishing my Hexies by Halves Pattern, I've had quite a few requests for a pattern featuring whole hexagons...you know...since some fabrics have prints that we just need to see the whole picture.


...So when I was invited to be part of the Wee Wander Blog Tour from Sarah Jane Studios, I knew I wanted to some something with whole hexies to show off the fun prints.

 I love how the orange triangles really let the fun prints on the hexies stand out and tell it's own story...because the Sarah Jane's fabrics always have a story to tell. You can see all of the fabrics in the Wee Wander Collection here on the Sarah Jane Studios blog and all hear some of the collections backstory.

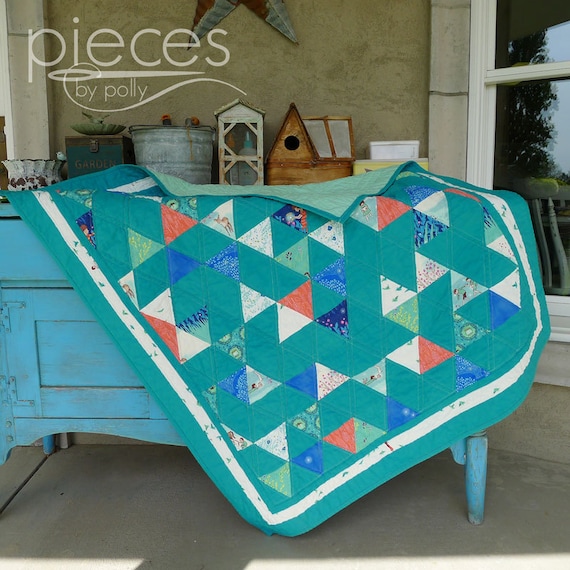
One bonus of this pattern also, is that you get lots of fun triangles left over from the blue and turquoise prints that can be turned into a fun scrap quilt like this (available in my shop here):


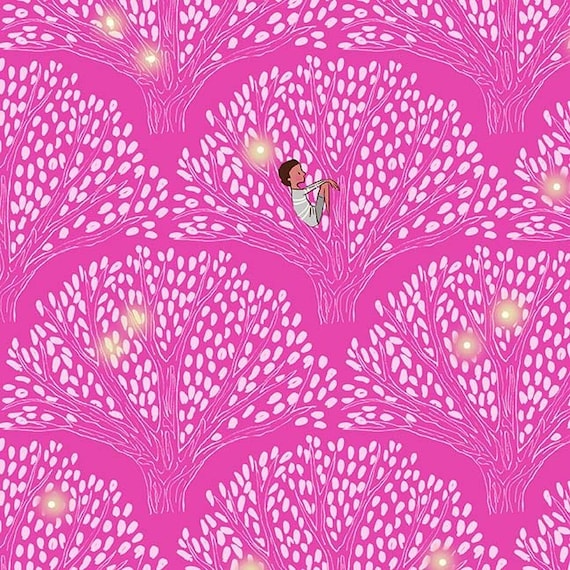
Plus I think the star patterns created by the triangles fits with the fireflies that show up on several of the prints.


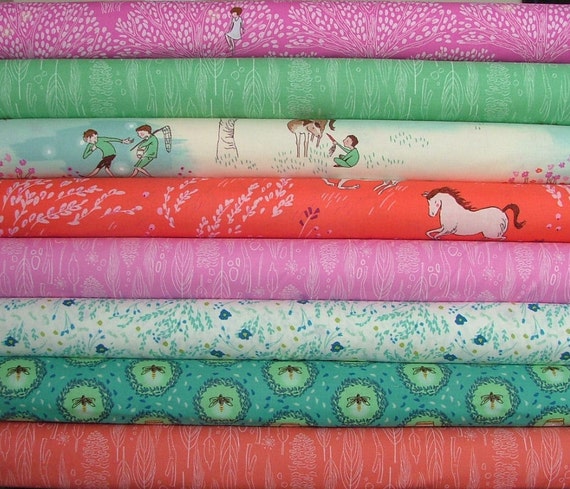
I chose to mostly use the blue and aqua prints from the Twilight Wee Wander collection, and then chose the orange Nature Walk print that comes from Sunrise Wee Wander to contrast with the hexies.

 I also think it would work beautifully to use the pinks and oranges from the Sunrise Collection as the Hexies and then use one of the Blue Nature Walk prints for the triangles.
 A few comments about fabric and where to purchase:
I chose the dimensions of the hexagons to make the best use of the fabric in 1/4 yard increments as I could. Therefore, I recommend NOT washing your fabric before you cut it as you may end up just a hair short from fraying edges and/or shrinkage. (A quarter yard is 9 inches wide and we'll be cutting strips that are 8 3/4 inches wide...so there will only be a tiny bit extra.)
You can find a list of fabric shops that carry Sarah Jane's fabrics on her blog here. As I was purchasing some Wee Wander Prints for some other projects, I discovered that very few fabric shops stock every prints, so you may have to check with several shops to find all the prints you want. While the fabric for this quilt was provided by Michael Miller Fabrics, I've received excellent service from Sisters and Quilters on Etsy, and they carry quite a few of the Wee Wander Prints and are always happy to put together custom 1/4 yard and 1/2 yard bundles.
Fabric Requirements:
***Finished Quilt size is 51 inches by 60 inches
2/3 yard of Summer Nights Panel (This gave me 4 large character hexies, and 4 night sky hexies)
1/4 yard each of 6 other Wee Wander prints for hexies... (Each 1/4 yard gives you 4 giant hexies.) I used Meandering, Tree Lights, With the Birds, Summer Ride, Glow Friends, and Wander Woods. If you want to be pickier and fussy cut the hexies, you might want to buy a bit extra. The only prints I fussy cut were the Summer Nights Panel Print and the Wander Woods. 1/2 yard of fussy cut Wander Woods gave me 5 hexies. If you want scraps left over for the accent strip on the back, then you may want to purchase 1/3 yard of each prints you're cutting hexies from.
1 1/2 yards of Nature Walk (I used Orange) for triangles and border
1/2 yard of Nature Walk (I used the darker blue) for binding
2 yards of Wander Woods or other choice of fabric for the backing.
2/3 yards of fabric for accent strip on backing or you can use scraps.
Pieces Count:
32 Assorted full hexagons, 5 inches on each side, cut from 8 3/4 inch strips
6 orange half+1/2 inch hexagons
62 orange triangles, 5 5/8 each side, cut from 4 7/8 inch strips
16 orange half triangles +1/2 inch (8 lefties and 8 righties) cut from 4 7/8 inch strips
6 orange width of fabric strips 2 1/2 inches wide
Template Dowload:
Download Wee Wander Hexagon Quilt Template 1 here.
Download Wee Wander Hexagon Quilt Template 2 here.
The hexagon template is slightly larger than a piece of paper, so I had to put it in two files to make it printable. You'll need to print both out on cardstock. Double check the sizing. The inside edge of the hexagon should be EXACTLY 5 inches. Tape the pieces together, so that the dash-dot-dot line overlaps exactly. When you cut out the pieces, you'll cut them out on the inside edge of the line. (I traced my pieces to come up with the pattern.) If you have any problems with printing please email at piecesbypolly (at) gmail (dot) com.
Cutting Your Fabric:
Many people like to use plexiglass templates for cutting out hexagons, however, I prefer to use angle marker on my regular quilting ruler. The main reason is that most of the hexagon templates on the market are for smaller hexagons. The other reason is that when carefully cut out, you'll end up with a lot of left-over triangles that are all exactly the same size...which make for some fun options for playing with the scraps. I am including a printable template that you can print onto cardstock if you prefer. I did use my cardstock template for the hexagons I fussy cut.
For fabrics that you do NOT plan on fussy cutting, cut strips the whole width of your fabric that are 8 3/4 inch wide.
Now you'll want to line the lower edge of your fabric up with the 60 degree marking on your ruler. You need to make sure that the line you're cutting is at least 5 inches long, inside of the seam allowance. (For instance on my ruler, all the angle markings converge at the 12 inch line, so I measure that 5 inches by making sure that everything from 12 inches to 7 inches is inside my fabric.) Trim and discard (or toss in your scrap pile) the piece you cut off.

Now line the 60 degree marking up with the upper edge of your fabric. You will want to make sure that the edge you're cutting will be exactly 5 inches. I do this my lining up the 12 inch mark with the upper edge of my fabric and

Next I carefully move my fabric so that either the lower or upper edge is lined up exactly with one of the inch markings on my cutting mat. This will allow us to measure the 5 inch lower and upper edge of our hexagons.
Line the ruler up so that the lower edge will be 5 inches as measured with your cutting mat, and the 60 degree mark is lined up with your lower edge. Cut.


Continue on until you've got 4 hexagons from each of your quarter yard cuts. The triangles left over can't be used in this quilt...but they can make a super awesome secondary quilt.

You also have the option to cut your fabric into strips, and then use the template for making the angles. I found I was able to be more accurate with my ruler though...and it's accuracy that is really going to make your corners come out nice and crisp in the end. Your template can also be nice for blocking out how the cut lines will fall to help with planning.

To cut your large character hexies from your Summer Nights Panel, you'll want to carefully cut out your template. Most of our hexies we cut across the width of the fabric, but we'll cut these out the direction of the selvedges so children will be standing up in our quilt. (So the top and bottom of your hexagon should be parallel to the selvedge of your fabric. Lift and peak a couple of times until you're happy with the placement of your characters.


I also cut the Wander Woods Print by fussy cutting. I don't think you would absolutely have to for this print, but I had a little extra of this print, so I decided it was worth it.

Cut 5 strips the width of the fabric that are 4 7/8 inches wide.


Trim off the seam allowance. Make your first 60 degree cut about 1/2 inch from the edge. (I just estimated 1/2 inch for this. 1/2 inch is actually slightly more than we need, and it's going to be on the very edge of the quilt and I always end up trimming my quilt edges a bit anyway.) This is 1/2 of our regular triangles PLUS an extra half inch...so when I talk about half triangles, I actually mean a half triangle PLUS the half inch.


Use your last strip to cut the rest of the triangles and half triangles. When you cut out the half triangles, make sure you cut some out alternating direction of the 60 degrees, or you'll end up with all lefties or all righties.
You'll need to cut one strip of orange that is 8 3/4 inches wide and goes the width of the fabric. (Same width as for all the hexies. We'll use this to cut out the orange half hexies...which are actually half a hexie PLUS a half and inch. You cut them out the same way as a whole hexies, except that after you've cut out your first two 60 degree angles, you'll measure 3 inches in and cut a vertical line. Then for the next one, you'll measure 3 inches (instead of 5) from the vertical cut, and cut out angled pieces. This will give you several 5 inch orange triangle scraps that are NOT the same size as the orange triangles in our quilt, so you'll want to set them aside


I'm usually not a bit fan of borders, but I'm sure glad I included on in this quilt. I cut my border strips to be 2 1/2 inches wide, so that they appear 2 inches in the finished quilt. You'll need 6 strips 2 1/2 inches wide, the full width of your fabric. (Although only a little of the sixth strip is used.)
Now you're done cutting, we're ready for the fun part!

Laying out Your Quilt
Someday I'll have a design wall for my quilts...but for now I used my floor. I laid out my pieces until I felt like I had a good balance. I didn't want too many light or dark hexies all in one place. I didn't want nearly identical hexie in the same area, etc.

Then once I'm happy, I always snap a picture. That way as I'm sewing if I get confused about where a piece went, I can go back and look at my photo.

Sewing Your Quilt
***All seam allowances are 1/4 inch.*** The closer you can be to 1/4 inch, the better your results will be.
One of the things I love about quilts with large pieces is how quickly they come together. To sew together our strips, we're going to start out by sewing the hexagons into diamonds by sewing a triangle onto opposite sides. Then the two ends get an extra corner added.
When we sew the triangles on, we have to make sure the corners are offset so that at the ends, the edges line up WHERE THE SEAM will hit the edge.


Then iron the seams open. (I'm typically iron my seams to one side, but since these aren't right angles, I felt like I got better results ironing them open.)

So our pieces should begin to look like this...

Now since this is an end piece, we'll go ahead and add the other half triangle.


Now as we should eventually end up with a row of diamonds, plus our two end pieces that look like this...

To sew the diamonds together, we're going to offset the corners just a bit, just like we did sewing on the triangles. We want the edges to cross WHERE THE STITCHING will go. We also want to match the seams in the middle...but we don't match them on the outside, we match them WHERE THE STITCHING will go.

I find the easiest way to do this is by sticking a pin through each seam 1/4 inch from the edge to hold it together.


You can sew right over the pin, and I sometimes do, but I find I get better results if I remove the pin just before it goes under the pressure foot, since the pin can sometimes cause the corner to be slightly off. (Although, the slight amount off the pin occassionally makes it is much less than the amount you'll be off if you don't pin it at all.)

In the end, we're hoping for nice crisp corners like this, although it may take a little practice.

And as you continue, you'll end up with a whole strip.


You'll sew the other strips together the same way, except the 2nd, 4th, and 6th strips, you'll start with a half-hexie at the beginning of your strip. Once you've got 7 completed strips, you can sew each of them together. Match each set of seams up with a pin 1/4 inch in from the edge, just as we did while sewing the diamonds together.
Once you've got the main part of your quilt sewn together, it's time to trim your edges. My edges had a few uneven parts than needed to be trimmed off.
Then you can sew on your boarders. I sewed all 6 of my boarder strips together in one long strip. Then I added them to opposite sides of the quilt.
Your Backing
Since this quilt top ends up slightly larger than the typical 44 inch wide fabric, you'll either need to purchase extra wide fabric or make a pieced backing. Since Michael Miller was very generous in their cuts, I had 3-9 inches of extra fabric scraps to play with...and I really love to add accent strips on the backs of my quilts to use up scraps and just to spice things up...plus it's often more economical than purchasing extra wide fabric. I cut a bunch of strips of varying widths and 10 1/2 inches long until they were long enough when sewn together to go the length of the quilt. Then I pick a spot in my main backing fabric...usually off to the side a bit from the center...and just slice it and insert my accent strip. If you want it to be even easier, you can choose 2/3 a yard of a single contrast fabric. If that's the route you choose, you'd need to cut two 10 1/2 inch strips and sew them end-to-end and insert them into the back.


Quilting and Binding
I used my regular home sewing machine to do the quilting myself. Lately, I like to use my presser foot as my guide and sew just over 1/4 inch on each side of my seams. I like the simple effect if gives to let the fabrics really stand out.
And last but not least, you'll need to add a binding. There are several ways I like to bind quilts. My current favorite method is to cut strips 3 inches wide, and for this quilt, you'll need 6 strips.

Note: The actual quilt pictured below is now available for purchase in my Etsy Shop here.
Connect with me on:


Please show my sponsors some love...

This turned out so beautiful!
ReplyDeleteWOW! What an awesome tutorial! Thank you SO much. I really love this fabric and your quilt really shows it off very well. Great job.
ReplyDeleteReally lovely, Polly.
ReplyDeleteThank you so much for the free pattern! What a beautiful quilt this is! I love the large hexagons and would love to make a simple, but fun quilt like this for my oldest boy.
ReplyDeleteGorgeous quilt! I love the fabrics, especially on the with the boy catching the firefly in the net. I'm pinning this to my Quilts board.
ReplyDeleteNavy Wifey Peters @ Submarine Sunday Link Party
Looks terrific, especially in these lovely fabrics. When I clicked to download template two it said I didn't have permission to download it.
ReplyDeleteThanks for the heads up, June! The problem with the download is fixed.
DeleteThis tutorial is really excellent. The pictures are clear, the added arrows pointing to the ruler measurements are extremely helpful, and your piecing techniques are top-notch. Thanks for the lovely free pattern, it highlights this fabric beautifully (I've been eyeing this fabric line for many months and have finally decided to take the plunge as a Christmas gift to myself. I'll likely keep it for myself, as I think I'll appreciate it much more than any child would -- and I don't have any of those. So I'm going to make it for the "child within"!)
ReplyDelete