
These quilted book cushions are the perfect addition to a reading nook, classroom, or library. In this lesson and the second lesson, I'll be teaching you how to make your own and also provide you with the printable covers and spine labels to be printed onto fabric. (And a huge thank you to Fairfield for providing the foam and batting for the project and compensating me for writing this post, making this project for our school library possible. All opinions and ideas in this post are my own.)

The covers velcro on to the base, so that they are easily removable for washing...because anything you plan to have kids regularly use, needs to be washable.


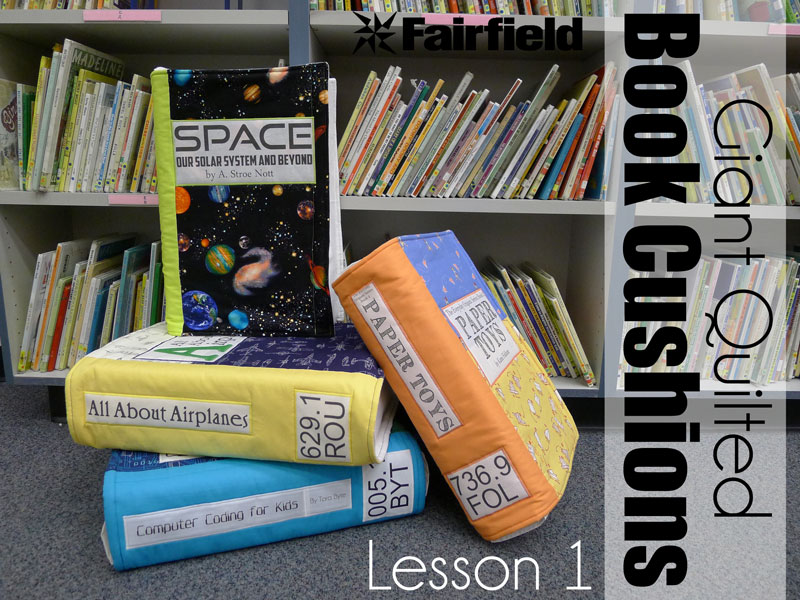
A while ago, a friend sent me a link to some small book pillows. I knew immediately that I wanted to make a much larger cushion size version for our school library. I'd been thinking about using popular children's book fabric like Dr. Seuss, Eric Carle, but hadn't come up with how I wanted the cover to look. Then the inspiration came to make them non-fiction books, and I knew it was time to make the idea a reality.
And not to toot my own horn too much...but I really REALLY REALLY love how these turned out.

They make me smile every time I see them.

And when I go in and volunteer everyday in our elementary school library, it makes me smile to see the kids enjoying them.


I LOVE to collect geek inspired fabric, and this was the perfect way to use some of it. Anything to help kids fall in love with science and engineering, right?

The only problem was I had to narrow it down to just 4 books...so you might be seeing more of these in the future.

This project does have a lot of steps, though, so I thought I'd break it down into two parts. Today we'll work on making the white inner cover, and in the next tutorial, I'll teach you how to make the book covers.
Time Required: 45 min - 1 hr for white cover (covered in this tutorial)...3 hours for one completed book.
Skill Level: Intermediate
Materials for One Cushion:
- 1 Piece - 12 x 18 x 5 in Polyfil® Project Foam
- 1 1/4 yards of White or Cream fabric (my favorite is Kona Cotton)
- 1/3 yard of main cover fabric or 2 fat quarters
- 1/4 yard or fat quarter of spine fabric
- 1 pack 36x45in NatureFil® Bamboo Batting or other Fairfield batting with similar feel.
- 2 Sheets of printable fabric OR make your own with Paper-backed Fusible Web + 1/4 yard additional White fabric
- 1 1/2 yards of sew-on velcro
- White Thread
- Pins
- Sewing machine
- Pencil
- Inkjet printer (DO NOT try to print on fabric with a LaserJet printer.)
- 1 Piece - 24 x 36 x 5 in Polyfil® Project Foam
- 4 1/2 Yards of White or Cream Fabric
- For each book cover: 1/3 yard of main cover fabric or 2 fat quarters
- For each book cover: 1/4 yard or fat quarter of spine fabric
- 1 pack 72x90in NatureFil® Bamboo Batting or other Fairfield batting with similar feel.
- 6 yards sew-on velcro
- 5 Sheets of printable fabric OR make your own with Paper-backed Fusible Web + 1/3 yard of additional white fabric.
- White Thread
- Pins
- Sewing machine
- Pencil

Instructions:
Start by cutting from your white fabric:
- 2 - 18x19 rectangles
- 1 - 6 x 43 inch rectangle (A 6 inch strip the whole width of your fabric)
Note: You will be using a white piece approximately 20x32 inches as part of your book cover in the next tutorial
Cut your foam into 12x18 rectangles. Sometimes you can get the fabric store to do this for you. An electric carving knife is generally considered the best tool for the job, but I had great success with my regular kitchen bread knife.


Set them aside and pull out your fabric. Arrange your 18x19 inch rectangles so that the longer side is along the bottom as shown in the picture. Mark the two lower corners with a dot 1/2 inch in from each side.

For the two upper corners, measure 5 1/2 down and 1/2 in from the top and mark.
Cut 2 pieces of velcro that are 18 inches long. Peel off the soft half and save it for when you're making the book's cover. Sew the rough half to the bottom of your rectangle, just a LITTLE MORE than 1/2 inch from the bottom, between your two marks. This velcro will hold your book cover on.


Start at one end of your 6 inch strip and mark each side 1/2 inch in as shown.

Matching your 1/2 inch mark on your 6-inch strip with the 5 1/2 inch mark on your large rectangle, begin pinning along the right side. Put your last pin, 1/2 inch from the bottom of your 18x19 rectangle, where your pencil dot is.

Begin at your marks (so you're leaving 1/2 inch unsewn at the top of your 6 inch strip) and stitch with 1/2 inch seam allowance along the right side of your rectangle until you're to your first 1/2 mark at the lower edge of your rectangle.

Use scissors to snip your seam allowance until you're almost to the needle, but not quite there. I also liked to back-stitch a little at this point, just for extra stability for the corner.

Pivot your work, so you can now sew along what was the bottom of your rectangle, and continue with 1/2 inch seam allowance.

Repeat the previous two steps when you get to the next corner.
Now that you're sewing the final side, you'll stop when you get to your 5 1/2 inch marking. you are likely to have a little more "extra" on this side than the 1/2 inch on the other side. You can either trim it, or leave it alone and you'll have a wider hem. (We don't need to be perfectionists on this part...it's not going to show.)

Now we need to mark where the 6 inch strip should meet our corners when we sew the other side of our 18x19 inch rectangle. I like to use my quilting ruler for this.

Matching up our markings as we did before, sew the second rectangle on with a 1/2 inch seam allowance.

Iron the edge of your fabric under by 1/4 inch, and a 1/4 inch again, so that your hem matches your seam allowances.

Sew down.

Snip the corners. Turn your cover right-side-out.


Cut another 18 inch length of velcro. Sew the soft side of the velcro to the INSIDE at the END of one of the flaps. Sew the rough side of the velcro to the OUTSIDE at the BASE of the opposite flap.


Now you're ready to close up your foam...all neat and tidy...and put it aside so you can make your book cover.
I'll have Part 2 of the Book Cushion Tutorial up for you soon!


Please show my sponsors some love...
Molecule Necklaces from Boutique Academia | Onyx Constellation Southern Cross Necklace from Boutique Academia | Binary Love Pendant from Boutique Academia | Pi Necklace from Boutique Academia  |

I love love love these cushions! They are awesome and I can imagine all the kids loving them, too.
ReplyDeleteThese are so so so awesome!! Thank you for doing a tutorial! My kids love to read and they love to have a few of these to sit on while they do so. I'm ecstatic to make some!!
ReplyDeleteI have to ask, where did you get the beautiful fabric? I would love to get my mom to help me make these, and they would go great in our new interactive play area at my library. They are fabulous! Thanks and God Bless!
ReplyDeleteBest original craft / sewing idea on the internet for now. Well done. You are a very clever cookie.
ReplyDelete