
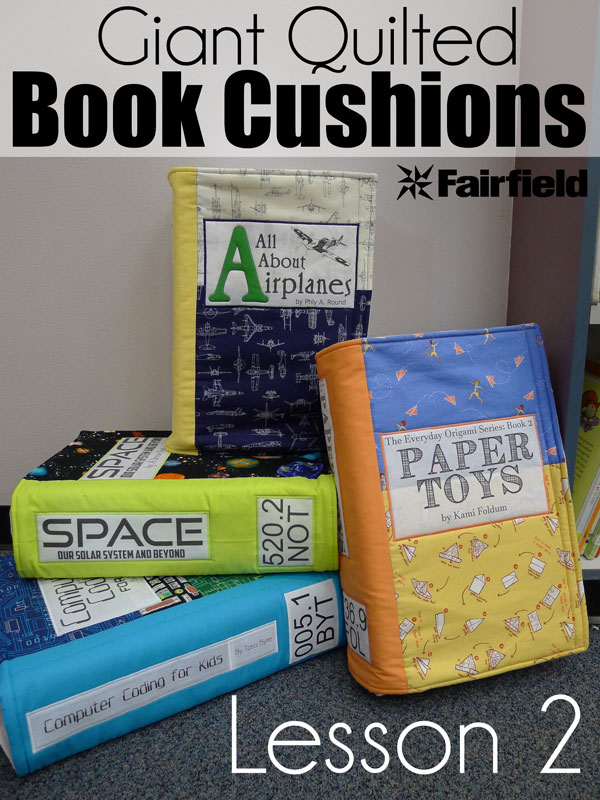
We made these awesome giant book cushions for the reading corner in our elementary school library.

A huge thank you to Fairfield for making these cushions possible. They provided me with the foam and batting and compensated me for writing this post. All opinions and ideas are my own.


The kids love them, and I hope they get the elementary kids excited about science and exploring more non-fiction books.


And the printing worked so well that the library barcode scanner can read the data from them.


Not gonna lie...these cushions were a big undertaking, but the end result was so worth it. I already have plans for making another set because I have so much more geeky/science/mathy fabric just waiting to inspire kids. You really need to make more than one, because they get easier each time.
So now I'll show you how to make your own. In Book Cushions Lesson 1, I taught you how to make the white base cover around your foam, so now I'm going to teach you how to make the book cover.
Time Required: 1-2 hours for the book cover (covered in this tutorial)...3 hours for one completed book.
Skill Level: Intermediate
Needed Downloads: Book Cushion Titles, Spine Labels, and Call Numbers plus Printable Barcodes
Materials for One Cushion:
- 1 Piece - 12 x 18 x 5 in Polyfil® Project Foam
- 1 1/4 yards of White or Cream fabric (my favorite is Kona Cotton)
- 1/3 yard of main cover fabric or 2 fat quarters (You may need 2/3 yard for a book cover if there is a directional print that requires your rectangle to face the other way on the fabric.)
- 1/4 yard or fat quarter of spine fabric
- 1 pack 36x45in NatureFil® Bamboo Batting or other Fairfield batting with similar feel.
- 3 Sheets of printable fabric OR make your own with Paper-backed Fusible Web + 1/4 yard additional White fabric
- 1 1/2 yards of sew-on velcro
- White Thread
- Pins
- Sewing machine
- Pencil
- Inkjet printer (DO NOT try to print on fabric with a LaserJet printer.)

- 1 Piece - 24 x 36 x 5 in Polyfil® Project Foam
- 4 1/2 Yards of White or Cream Fabric
- For each book cover: 1/3 yard of main cover fabric or 2 fat quarters. (You may need 2/3 yard for a book cover if there is a directional print that requires your rectangle to face the other way on the fabric.)
- For each book cover: 1/4 yard or fat quarter of spine fabric
- 1 pack 72x90in NatureFil® Bamboo Batting or other Fairfield batting with similar feel.
- 6 yards sew-on velcro
- 6 Sheets of printable fabric {affiliate link} OR make your own with Paper-backed Fusible Web. + 1/3 yard of additional white fabric. (I made my own.)
- White Thread
- Pins
- Sewing machine
- Pencil
You can really go a lot of directions with these book cushions. You could keep them super simple by just using one fabric for the outside of your cushion and leaving off titles completely. You could also go super fancy and use embroidery and other embellishments to try to recreate "real" covers of your favorite books. We're basically going to be making mini quilts that will attach to our cushions with velcro.
I wanted to use really fun novelty fabrics to celebrate some favorite non-fiction topics, and then made my own titles and punny authors names to go with them.
Following manufacturer's directions, print your covers, spine labels, call numbers, and barcodes onto your printable fabric {affiliate link). You can also make your own printable fabric by cutting out 8 1/2x11 pieces of paper backed fusible web, attaching them to cardstock at the leading edge with scotch tape, and running them through an INKJET printer. DO NOT try to print on fabric through a laserjet printer. You will ruin your printer.

Cut out labels, just INSIDE the lines, so the lines are no longer on your pieces.

I'll be giving instructions for making covers with a different color fabric for the spines, but you can piece your covers together any way you'd like. You just want to end up with a rectangle of fabric that is approximately 20 inches x 31 1/2 inches.
Start by cutting two cover pieces that are 20 x 12 inches. These will be your front and back cover. (In some cases, I had two or three fabrics I wanted on the cover, so I sewed several smaller rectangles together to get these pieces.)
Cut a piece for your spine that is 8 1/2 inches x 20 inches. I liked to choose bright, contrasting/coordinating solids.
I liked to add the spine labels before sewing sewing the spine fabric to the front and back cover fabric. Center the call number label 2 inches from the bottom edge.

Center your spine title label in the remaining space.

Iron well to secure.

Sew around the edges with a tight zigzag or satin stitch. I used thread that matched the color of the spine, but you could go with white thread too. Instead of backstitching, leave the thread tails long, pull them through to the back, and tie in a secure knot.

Use a scant 1/4 inch seam allowance for sewing cover pieces together.


Now set your cover aside, while we work on the white underside. Cut a rectangle from white fabric that is 20 inches by 31 1/2 inches. (This should be the same size as the front you just finished sewing.
Remember the 2 pieces of 18-inch long velcro (the soft side) that we saved when we sewed our white cover together? Pull those out. Set your ruler 2 inches from the edge of your rectangle (parallel to each of the 20 inch sides) and pin your velcro there.

Sew velcro securely. Repeat for the opposite side.

Now we'll start building our quilt sandwich. Start with two layers of batting, on the bottom, then your outside cover piece with the titles facing UP. Trim batting.

Finish off the quilt sandwich by adding your large white rectangle with the velco facing DOWN.

Pin well around all four sides.

Sew around the edge with a 3/8 inch seam allowance, leaving a generous opening (large enough for your hand to comfortably fit through) in the bottom of the back cover. Trim corners.

Turn your cover right side out.


Carefully pin around all four edges, pinning your opening closed in the process.

Now comes the fun of quilting it. I started by sewing around all four edges about 3/8 inches from the edge.

Then I stitched about 1 to 1 1/2 inches in from the edge on the two shorter sides, making sure I was stitching through the velcro. This was to secure the velcro to both the front and back layers.

Then I "stitched-in-the-ditch" everywhere that I had a seam...along the edge of the spine, and if my front cover was pieces, through that seam as well. I also stitched around each of the spine labels.

If the covers were just one pieces of fabric, like the space book, I made an extra line going through the back. (I didn't want too large an area with no stitching.)

Hand sew the opening in the lower back of the book closed.
Wrap your cover around the white cover, to check the fit. Peel off the paper backing of the front cover title.

Decide on the placement of the title while the cover is still on your "book." This will mean centering it for the whole front portion of the book.

Iron enough that it is lightly secured.

Then remove the cover and iron securely. Stitch around the front title with a tight zigzag or satin stitch, just like we did for the spine titles. Pull the threads to the back. Tie a knot, then bury the threads between the layers of your cover.

For the airplane book, you may want to applique the large A shape for added interest. (My 3-year-old LOVES A's, so I did this one in honor of him...this is his favorite book cushion when we go to the library.)
Trace the A in reverse on the papery side of paper backed fusible web. Iron onto the fabric of your choice. Cut out the A.

Peel off the paper backing and apply to the cover label. Stitch around the edge with a tight zigzag or satin stitch.
I almost left out the barcodes because I had so much to do, but they really do an a nice finishing touch.


I used the barcode generator from this site to make the jpegs I used. I set the DPI Output box to 300 so it would give me a large enough image to print clearly at the size I needed for our books. I used the same number of digits as real book in our library...and it turns out they are REALLY scannable. The kids LOVE this. My barcodes have our school name on them. I've made up some generic ones that say PROPERTY OF THE LIBRARY for your use, if you don't want to come up with your own. There are four different versions in the file.

And from here the sky is the limit with your creativity. If you decide to make your own book cushions, I'd LOVE to see your finished cushions. Feel free to share with me on Facebook, Pinterest, Instagram, and Flikr via the links below.


Please show my sponsors some love...
Molecule Necklaces from Boutique Academia | Onyx Constellation Southern Cross Necklace from Boutique Academia | Binary Love Pendant from Boutique Academia | Pi Necklace from Boutique Academia  |

These are so cute. Thank you for the wonderful tutorials. Could you please check the downloads. All 3 downloads on this page are all the same. I'm not finding any download for the barcodes you created. Both places that show are the download link for the barcodes are the same as the first file.
ReplyDeleteThank you