

And besides, Halloween, they're also great for 50's dress-up days, and just plain anytime you want your girls (or yourself) to look adorable.


Dress-up poodle skirts are usually made from felt, but felt can pill badly when washed and the shape can get distorted, so we made ours starting with soft Cuddle Suede from Shannon Fabrics. Just a heads up that the trim said it was dry clean only, but I've already washed Becca's skirt...and even forgot and put it in the drier...and it came out great. (Although I would recommend not putting it in the drier.)


How to Make a Poodle Skirt with Cuddle Suede
Difficulty Level: Intermediate
Time: About 2 hours
Materials:
- 1 1/2 - 2 yards Cuddle Suede depending on the size of your skirt. See instructions below for more details. We used Cuddle Suede in Fushia.
- 3" Wide black elastic long enough to go around the skirt wearer waist + 1 inch.
- 1/4 yard or scraps of Cuddle fabric for applique. We used Rose Cuddle in Snow White and Solid Cuddle 3® in Black. Personally I prefer the look of the White Rose Cuddle for this project, but my oldest begged for a black one.
- 1-2 Yards Black 1/2" Chinese Braid from Decorative Trimmings for winding poodle leash. Note that the washing instructions for this said Dry Clean only, but I did a test was, and decided I was comfortable washing it, but I do NOT plan on putting this skirt in the drier. If you use this trim, you will want to air dry.
- Small scraps of ribbon or trim for collar and ankle decorations. We used Fuchsia Renaissance Cross Stitch for the collar and 1/8" Gold Flat Braid for the ankles.
- 1/4 Yard Soften Interfacing
- 1/4 Yard Paper-backed fusible web
- Poodle Template
- Matching threads
- Sewing scissors and/or rotary cutter and mat
- Sewing Machine
- Serger is helpful, but not required for hemming skirt.
Instructions:
Poodle skirts are made as circle skirts, which are really easy and don't required a store bought pattern. Rather than writing out a whole tutorial for these, go check out the excellent tutorial on MADE by Dana. You'll find the instructions for a child's skirt first, with modifications for an adult skirt at the bottom of her post. Cuddle Suede fabric comes 58" wide, so 1 1/2 - 2 yards will work for most older kids and slim-medium sized adults.
Start by cutting out and hemming your skirt, but DON'T PUT THE ELASTIC ON until after you've finished your skirt embellishments because the poodle's leash is going to tuck up under the elastic.
I preferred to use a serger to hem my skirts. Use your serger manual to find the settings for a "rolled hem." If you don't have a serger, they do make really nice hems, so you might check with some friends to see if you borrow one. If you don't have access to a serger, you can do a tight zigzag stitch around the bottom and/or a really narrow hem. You want the hem narrow, because the hem curves so much.
Trace your poodle pattern (download pattern here) onto the papery side of your paper-backed fusible web. Cut out.


Iron onto the BACK side of your poodle fabric. Note that most cuddle fabrics are made from polyester, so you do NOT want to use your highest iron setting. Iron just as much as necessary and not more. Keep in mind that the poodle on your skirt will be facing the OPPOSITE direction that they face on your paper. So I've traced mine looking to the left, and they are going to be looking to the right on the skirt.

Cut out around the edges of your poodle.

Peel off the paper backing.

Iron onto your skirt an inch or two above the hem line. Irons just enough to get the poodle to LIGHTLY stick to the skirt. Then turn the skirt over and iron more thoroughly through the back of the fabric.

Thoroughly pin your Chinese braid or other trim so that it loops around from the back of the poodle's neck and up to the waist line of the skirt.

Securely stitch using your sewing machine. Start at the waist sewing down one side of the trim with a straight stitch. Thoroughly zigzag over the raw edge of the trim at the poodle's neck, and then stitch up the other side of the trim again with a straight stitch.

Iron your Soften interfacing on the BACK of your skirt, so it completely covers the area behind and around your poodle. The Cuddle Suede is thick enough that it tolerates the applique stitching really well, but a light interfacing behind it, just adds a tiny bit more structure for all the stitching we'll be doing.

Add your collar embellishment. You may want to spray the back of it with a bit of basting spray or other temporary adhesive, but I just carefully held it in place. With matching thread, do a tight zigzag stitch over the raw edges on the two ends, and a straight stitch over the longer sides.

Since I don't like too much extra stitching, instead of backstitching at the ends, I pull all my threads through to the back and tie a secure knot.

Now we get to applique our poodle. We're going to do this in three stitching lines. Using matching thread, do a tight zigzag or satin stitch around the head from collar to collar. Leave your thread tails long so you can pull them through the back and tie a knot. Repeat for stitching around the poodle's lower body.

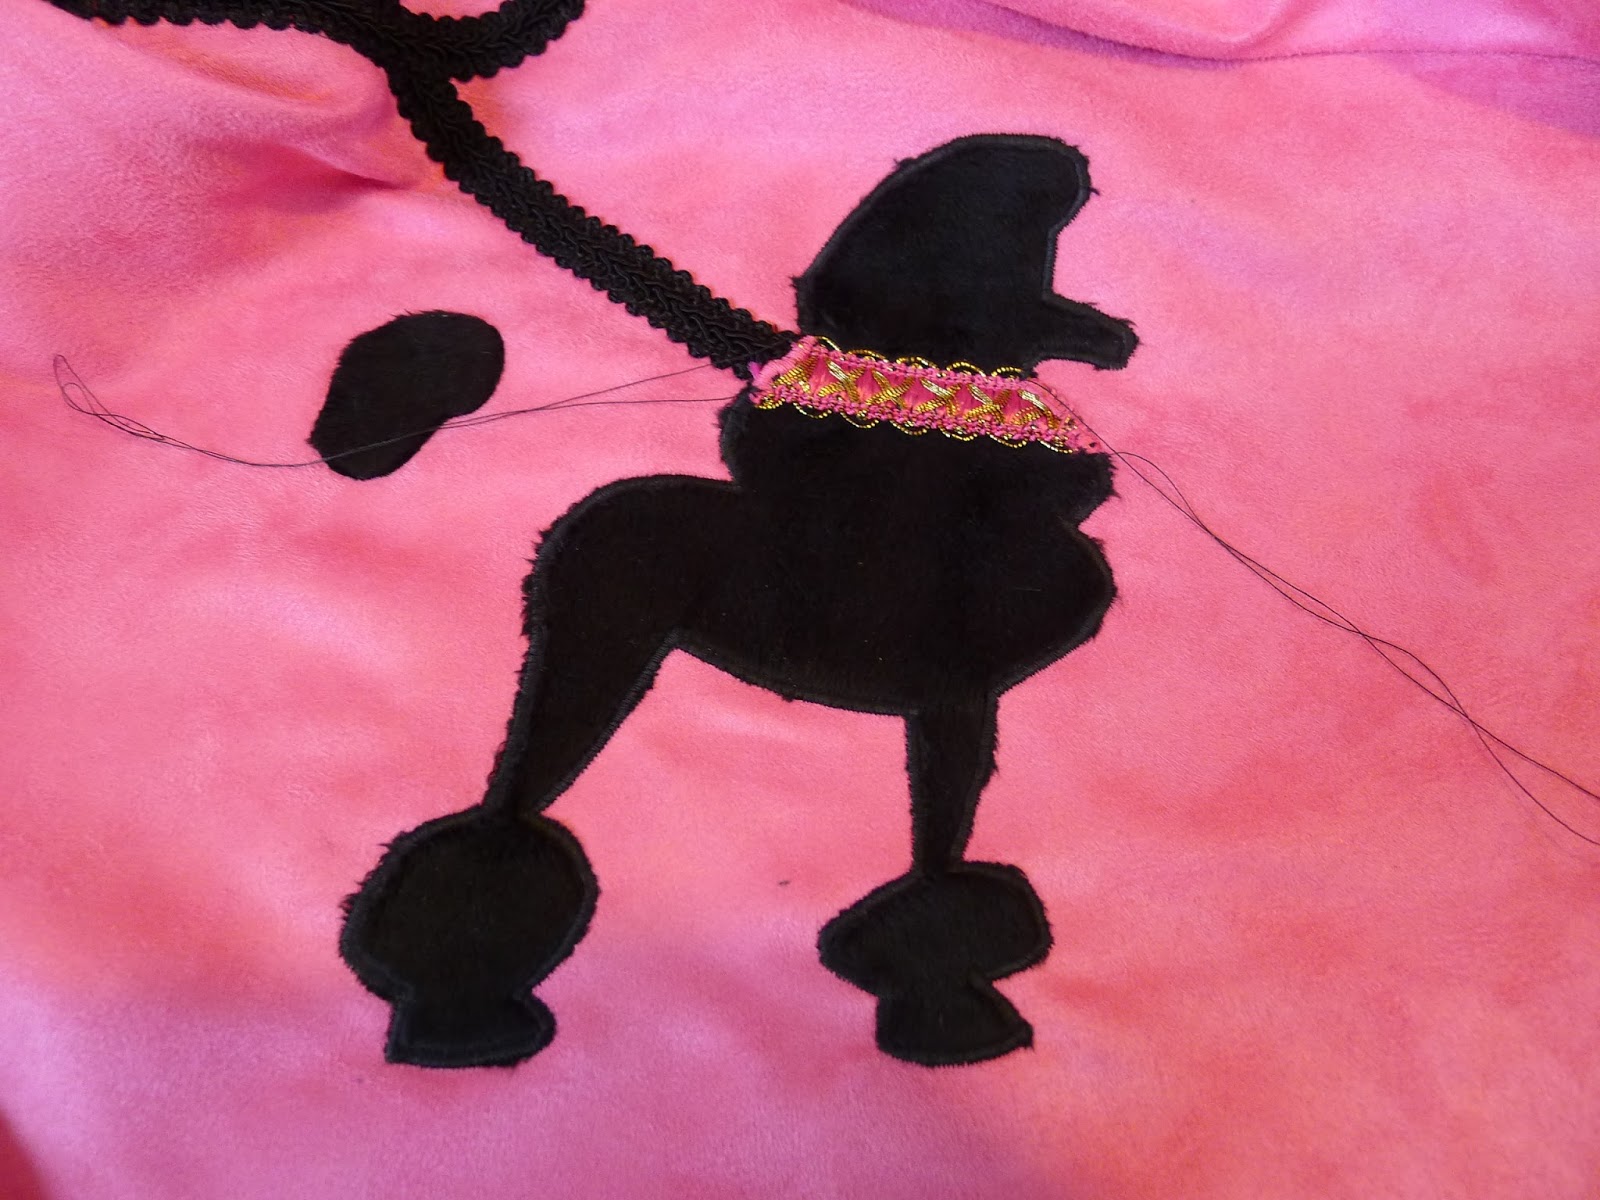
Finally stitch around the tail poof. Start under the poof at the point closest to the dogs bum, so that after you stitch around the poof, you can increase the width of your zigzag and stitch the thin tail connecting the poof to the poodles backside. Pull all the threads to the back and knot securely.


If you want ankle decorations, add them now. They're a bit tricky to get to stay in place because they're so tiny. Another alternative is to just use contrasting thread and do a little zigzag embellishment across the ankle.


Trim off excess interfacing from the back.


Now you're ready to finish off your skirt by stitching the elastic waist on. This is one skirt that you don't want to skimp on the elastic. A nice wide elastic creates a nice waistline and really lets the skirt shine. For directions on sewing on the elastic, see Dana's circle skirt tutorial.
And finally once, you're finished with your skirt, you really need a petticoat to make it shine. You'll find my tutorial for making an easy petticoat with Oly*Fun in less than 30 minutes on the Fairfield website.


No comments:
Post a Comment
Thanks for taking the time to comment. I love hearing from you. I also love responding, so please make sure your Blogger account is set up for me to be able to see your email address or include your email address. I've had to stop accepting anonymous comments due to spam. If you don't have any other way to comment, you can always send an email.