
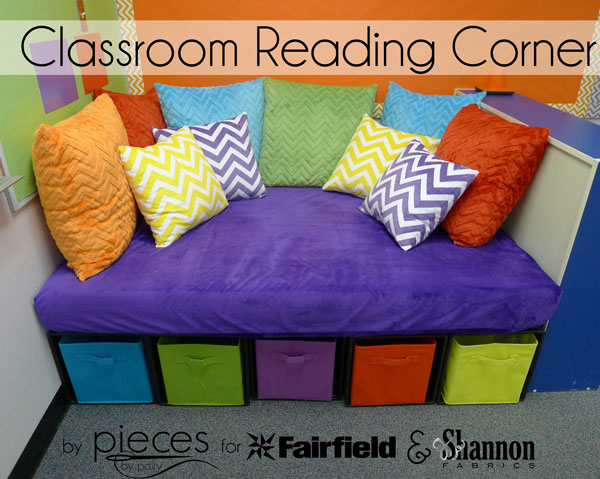
My daughter's first grade teacher last year was brand-new to our school, and this year, she got to move in to a larger room with space for a reading corner. She wanted a really large bench with lots of pillows for relaxing. She's decorated her room with bright bulletin boards surrounded with chevron trim, so we decided to keep with that theme for the reading corner too.

We also knew that it was a MUST that the reading bench cover and pillow covers come off for easy washing. I NEVER donate any fabric goods to the school that can't be washed.

The size of our bench was determined by the size of the storage crates she was using underneath and the space she had available in the room. Your dimensions might be different, but we'll explain how to adjust the size, so you can make whatever size fits your needs.
Time: A couple hours for the cuddle covered reading bench. Time for pillows depends on how many you make.
Size: Our bench measured 48 x 66. The width was determined by the size of the foam, the length was determined by the size of the crates.
Materials:
2 pieces Soft Support CUSHION Foam 72″ X 24″ X 5″ Thick
5 yards Shield Liner Fabric 41.5″ Wide
1 pack Poly-Fil Extra-Loft® Batting 72″ X 90″
3 yards Cuddle 3 or other Cuddle Fabric. (We used Solid Cuddle® 3 Purple.)
2 packs 1" Elastic from Dritz.
Staple Gun and Staples
Crates or other supports for the bottom. (We used some similar to black plastic crates.)
Fabric Cube Drawers (optional)
Sheet of plywood cut to desired size
Wood blocks to support back or additional crates.
Screws and drill
Notes about Size Adjustments:
- If you have a bench already built...use that to determine the size.
- If you're building a bench, keep in mind that the foam comes 24" wide, so 24" for a narrow bench or 48" for a wide bench are ideal.
- Cuddle fabric comes 60" wide, which works perfectly with a 48" side cushion. It gets much more difficult if you go larger than 48" because you'd have to use a 3rd piece of foam and piece together your cuddle fabric.
Instructions:
Cut a piece of plywood or other sturdy support to the size you want for your bench. In my case the teacher we were making this for, took care of it ahead of time. We cut the wood 1" narrower than the foam (cut at 47" wide instead of 48" for the two pieces of foam) so that the foam would stick out slightly past the wood. The sides were cut the same length as our foam because the wall is on one side and a bookshelf on the other.

If you need to attach any supports for the back, screw these in securely. You want them to stay several edges away from any of the edges, so our cover can pull tightly around the edges. Anything that needs to be permanently attached needs to go on before the foam if you're going to cover it with a layer of Shield Moisture Barrier.

Lay out your foam. We had to trim about 5" off the ends of each of our pieces because they were a bit too long. I don't have an electric carving knife (although I should get one considering all the foam I use), so I just used a good bread knife. You want something serrated to get through the foam.

Many people can be surprised at how sharp the foam lines will appear if you put a cover straight over it. The way to soften those lines is to wrap the foam in batting. Because our foam was in two pieces, we opted to double wrap the top and front and down the sides a bit, and not fully wrap the bottom and back. (I was using batting off a large roll that came 48" wide, but if you pick up one pack of Poly-Fil Extra-Loft® Batting 72″ X 90″, you should have pretty much exactly the right amount.)

For a bench this wide, we needed to cut our 5 yards of shield liner fabric in half to get two 2 1/2 yard pieces. Then we sewed those together along their sides to get a wider piece. The shield can be sewn together either way, but we sewed it with the SHINY sides TOGETHER. My machine lines it better that way and we wanted the shiny side facing out for easier wiping-off should there be a spill or accident on it.
We laid our piece of shield SHINY side DOWN on the floor. Then put the wrapped foam on top of that. (That's the tough part...you may need an extra set of hands.) Then we put the wood upside down over that. Make sure there's 8+ inches of Shield around each side of your foam/wood.

Use your staple gun to go around the edges and staple the shield in place. You want it to be snug, but not too tight. At the corners, you'll need to fold it on top of itself a bit and use some extra staples. Remember no one is going to see underneath, so don't worry about what it looks like on the bottom, you just want the top/sides to look smooth.

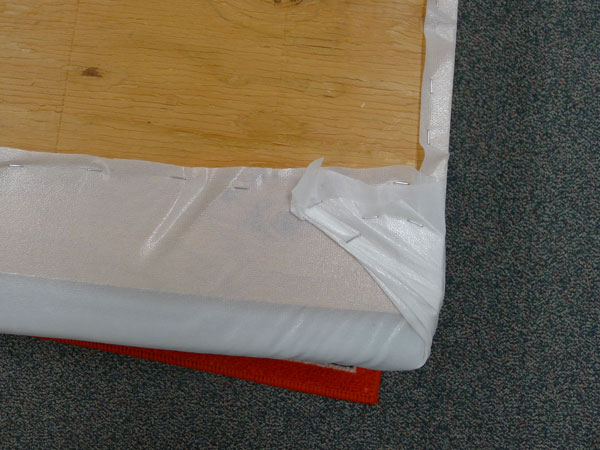
Now you're ready for the cover. The combination of the batting wrap and pulling the shield snug round out the corners of the cushion nicely.

Depending on the kind of use you think your reading corner will get, you COULD also staple the cuddle cover on....but I personally NEVER make anything out of fabric for my kids' school that can't be washed. Just the wear and tear of that many kids demands washing from time to time, not to mention kids having accidents, getting sick, or the ever dreaded head-lice outbreaks. Our cover slips over the cushion much like a fitted sheet for easy removal and easy replacing.
For your cover, you're going to start with a rectangle that is the size of your cushion, PLUS 10 inches. This accounts for the 5" cushion sides. (If you're not using cuddle fabric or fabric with some stretch to it, you may want to give 6" for the sides to add in the wood. Cuddle stretches a little though, and I wanted the cover to look snug.
Once you've got the right size rectangle for the top, you're going to cut out a 6" square from the corner.)


With the Cuddle sides together, fold each corner to bring the sides of the squares together. Pin and sew with a 1/2 inch seam allowance.


Now we're going to make the casing for the elastic, that will hold the cover snug. Cut enough 6" width of fabric strips from your remaining cuddle to go all the way around your cover. (Our cover was 228 inches around, so we needed 6" wide strips.) Sew together end-to-end.

Fold your strips in half with the CUDDLE side OUT. Sew. We'll call this our casing. Because my machine has a built in even-feed system, I didn't pin, but you may want to pin and/or use a walking foot on your machine.


Starting in the middle of one of your sides (preferably not the front), sew your casing to the CUDDLE side of your cover with a 1/2 inch seam allowance. (This way the seam allowance will be on the back. Again because my machine has an even feed system, I did not pin this part...but you may want to pin or use a walking foot. However, because of how this is going to be used and we want it to be snug...you could probably get away with not pinning this part on any machine because it's okay if the casing gets stretched a little as you sew. Can you tell I don't like pinning?!?)
Sew your two packs of elastic together end to end, so you end up with one LONG piece of elastic. Usually I use a safety pin, to guide things through, but the casing is so long I wanted something longer. So I used my dritz Point Turner/Seam Creaser to thread the elastic though. I don't think that's what it's really designed for...basically you need something to attach your elastic to to pull it through the long casing. I that hadn't worked, the next think I was going to try was hot-gluing it to a chopstick and then just cutting that part of the elastic off when I was done.
Put your cover on over your cushion. Pull the elastic snug. You're going to end up pulling a decent amount of the elastic back out. I tied a good knot and then trimmed off the extra elastic. Since this was on our edge, I didn't do anything to sew the casing closed or particularly try to hid the elastic. I wanted it accessible in case the teacher needed to tighten or adjust the fit later.

Once our cover was done, it was time to move the bookcase back in and add some pillows.


You can find the instructions for making the large Chevron Tape-Basted Zipper Pillows (for people who don't love pinning.) here on the Fairfield website.
You can also find the tutorial for the smaller Easiest Ever Cuddle® Pillows here on the Shannon Fabrics Blog.
You can find Shannon Fabrics at many local quilt shops and fabric stores, and online at fabric.com, theminkyboutique.com, and fabricdepot.com. Or, view their Store Locator to find shops near you. Fairfield products can be found at nearly any craft or sewing store.


No comments:
Post a Comment
Thanks for taking the time to comment. I love hearing from you. I also love responding, so please make sure your Blogger account is set up for me to be able to see your email address or include your email address. I've had to stop accepting anonymous comments due to spam. If you don't have any other way to comment, you can always send an email.