Whether your looking for comfortable classroom reading space, or a relaxing place to do homework or watch TV, these giant floor bean bags will be the perfect fit. The Shannon Cuddle fabrics on the outside makes them snuggly soft and you'll love that the 60" wide fabric makes it easy to make nearly 30" large bean bags.
Materials: Amounts given are for one bean bag.
- Poly-Fil® Biggie Bean Bag Filler
- 7/8 yard 60" wide Cuddle Fabric for outer bag (Fabrics shown in this project are Embossed Star Cuddle® in Lime, Solid Cuddle® 3 Saltwater, Embossed Houndstooth Cuddle® in Silver.)
- 1 2/3 Yard Inexpensive regular width Fabric for inner bag
- 30" zipper
- Double-Sided Tape
- Coordinating Thread
Instructions:
The hardest part of this project is cutting out such large pieces. Fortunately, they're so large that if you're a tad off, you'll never notice in the end. I always cut my fabrics out squaring the ruler with the center fold. In this case, I folded the Cuddle back on itself once so that I could cut out both squares at one time and make sure they're exactly the same size and the whole thing would fit on my cutting mat at one time.
Cut two squares of Shannon Cuddle 30" x 30". You'll basically be cutting a 30" length and then cutting down the center fold line.
First we'll install our zipper. It's traditional to use pins to hold the zipper in place when sewing, but the Shannon Cuddle can be so slick that I've had good results with using double-sided scotch tape to hold the zipper in place. I used a "parka" zipper because that's the only kind that came in a long enough length.
Add double sided tape to the outside half of your zipper. Just on one side to start with and on the same size as the zipper pull.
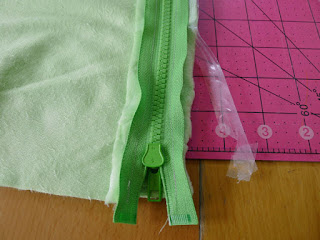
With zipper-pull side down, line it up so that the double sided tape that's sticking out a bit is even with the side of your bean bag cover, like this.
Stitch about 1/8 inch from the zipper. Remove the tape. (You'll have an easier time removing the tape if you sew close enough to the zipper that you haven't stitched through the tape.)
Your project should look like this at this point.
Add tape to the other side of the zipper and repeat for the second piece of your bean bag.
Open the zipper wide enough that you hand can make it through. With right sides together, stitch with a 1/2 inch seam allowance around the three sides of the bean bag cover. If you have extra zipper left, stitch so that the extra will remain on the inside.
Clip corners and turn right side out.
Now we'll make our inner bag. Cut two 31" squares from your inner bag fabric. (You always want your inner bag to be slightly larger so that it will completely fill your outer bag and look plump. We're not going to completely stuffing our bag anyway.) Stitch around all 4 sides of your inner bag squares, leaving and opening big enough for your hand.
Double stitch the seam to re-enforce it. We really don't want that bean bag filler getting loose. Clip corners.
Turn right side out.
Fill with bean bag filler. I found that it took just under one 2 1/2 pound bag of bean bag filler to fill one 30" bean bag. The more full you fill it, the firmer your bean bag will be. If you want a bag with more "squash" and give, then you'll want to fill it a little less full.
Stitch closed. You'll definitely want to machine sew this bit to make sure it's strong and will withstand kids jumping and sitting on it without bursting.


No comments:
Post a Comment
Thanks for taking the time to comment. I love hearing from you. I also love responding, so please make sure your Blogger account is set up for me to be able to see your email address or include your email address. I've had to stop accepting anonymous comments due to spam. If you don't have any other way to comment, you can always send an email.