
I know it's a bit early for working on Christmas projects...but let's be serious. Starting now, is the only way I get Christmas sewing done before the mad rush.

Anne of Green Gables was one of my favorite book series in middle school, and Gilbert Blythe from the first two Anne of Green Gables movies was my first celebrity crush. So I was SUPER excited to hear about this year's Anne of Green Gables Christmas fabric collection, and new I needed to make a quilt...but not just any quilt...a quilt worthy of Anne herself and one that I could imagine on her bed at Green Gables or in her cozy House of Dreams.

After looking through some vintage quilt inspiration, I came across this quilt made by Jane Austen and the other women in her family. I thought even though Anne herself did not like patchwork...she might have been willing to make a quilt fashioned after a pioneer of English women's literature.

These fabrics stand alone as a great Christmas collection, but the peaks of Anne and her world add an extra special touch.


Finished Size:
54" x 72" - Oversize Throw Quilt
Materials:
- 1/4 each of the following 9 fabrics from the collection:Anne Poinsettias - Green, Anne Holly - Green, Anne Holly - Grey, Anne Silhouette - Green, Anne Silhouette - Red, Anne Stripe - Green, Anne Stripe - Grey, Anne Swiss Dot - Green, Anne Swiss Dot - Red
- 1/2 Yard of your favorite of the Main "Anne" fabrics. I chose Anne Main Red.
- 1 Yard Anne Stripe - Red (for diamonds AND binding)
- Basic Shades - Linen from Riley Blake (That's 100% cotton fabric "linen" colored.)
- 2 1/4 Yard Backing fabric PLUS scraps, Anne Panel, or other chosen fabric to widen OR 2 1/4 Extra wide backing.
- Nature-Fil™ Bamboo Blend Batting 72″ X 90″ (or 2 1/4 yards from a 60" wide bolt) - Cotton batting can also work well, but the bamboo blend batting is SUPER soft and gives the quilt and instant heirloom worn-in feel.
Start by cutting ONE 8 1/4 inch Width-of-Fabric strip from each of the fabrics from the Anne fabric line EXCEPT your Main Anne fabric with the large pictures.
Trim off the selvage. Then starting 1/2 inch in from the edge, use the 60° angle tool on your ruler to cut 7 triangles from each strip. Plus you'll end up with two "half triangles" that we'll also use to even the ends of our rows in the quilt.

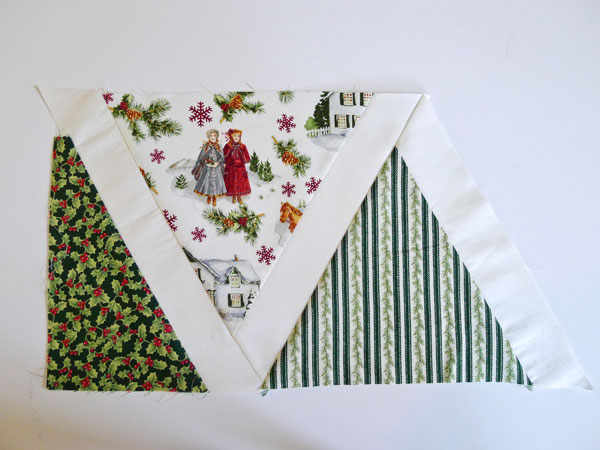
If you're cutting one of the striped fabrics, you'll want to stop and start the stripes at the same place on the triangles. You can do this by cutting a thin strip out and discarding. In the case of the triangles below, the left corner of each triangle starts on the left side of a red stripe set. These will become the matching top and bottom of a diamond in the quilt.

For the main Anne fabric, we'll "fussy cut" the triangles so that we can take advantage of the large-scale pictures. You can use this template to center the pictures in your triangles. Even when using the template, I still recommend using the ruler with your cutting tool, to get really nice, crisp edges. You can cut more or fewer of these depending on how much of The-Anne-Girl you want to have in your quilt. Be sure to cut half of the triangles "up" and half of them "down, so that they will go together into complete diamonds without the pictures being upside down.


Cut 3 more 2" Width-of-Fabric strips. We need 8 pieces that are a bit longer and have the cuts going the same direction. These should measure 11 1/2 inches along the lower edge.

You should end up with the following pieces PLUS the 8 longer sashing pieces shown directly above. According to the cutting directions, you'll actually end up with 76 equilateral triangles and 20 "half" triangle ends, so you'll have a couple of extras.

Finally cut 7 more 2" width-of-fabric strips from your sashing fabric. Set aside as whole strips for adding the outside border to your quilt at the end.
Dividing your Fabrics
Divide your triangles into "Up" and "Down" pieces. Even the fabrics that don't have an up or down to the picture will still have correct up-down direction. You can test this by pulling on the fabric slightly. The fabric will NOT stretch along the grain, which should be pointed up or down.
You're going to sew a piece of sashing to the RIGHT (as in left or right) side of all of your triangles. This is why it's important for you to have them sorted into UP or DOWN pieces at this point.
Adding Your Sashing
Line your sashing up so that the fabrics meant 1/4 IN FROM THE EDGE. This means that when we sew with a 1/4 inch seam allowance, the fabrics meet right where the stitching will go through.

Trim any excess sashing to line up with the triangle.

Once you've sewn the sashing piece to each triangle, It's time to arrange them into your quilt. I tried to scatter the different fabrics fairly evening and keep red vs. green balanced as much as I could.

Fill in the half-triangle ends. Ends on the LEFT side of the quilt will get the LONGER sashing pieces sewn to them. Ends on the RIGHT side of the quilt do NOT get sashing.

To add the sashing to your end pieces, you'll line them up 1/4 inch in, just as with the larger triangles. They should look like this after being sewn and ironed. Trim pieces even with THE WIDER side of the half-triangle.

Also note that because of the way we cut our fabric and for sake of making our quilt yardage-friendly and more economical, any prints with a "direction" on our ends will have one part upside down. (Note the lower half of the end pieces below. This seemed like a small price to pay for saving on fabric.)
Sewing Your Quilt Top
We'll start by sewing our top now, row by row. I typically like to make sure I've taken a picture at this point to make sure I don't mix up pieces. Then I stack the pieces for one row on top of each other in an organized way.
I sewed my pieces together from left to right. Assuming you've neatly trimmed the ends of your sashing, our pieces now should line up with each other pretty exactly. Stitch with 1/4 inch seam allowance to sew the sashing from your end piece to the triangle of your next piece.


Add your next triangle, sewing the triangle edge to the sashing from your previous piece


When you get to the end, you will line up the WIDE part of the end piece to cross 1/4 inch in from the edge.


Repeat to sew all of your rows together.
Then sew your rows to each other, lining up seams and making a special effort to line up stripes when stitching striped pieces together.

When your quilt top is sewn together, you'll need to trim the edges flush with where the end pieces mean the sashing.


Sew the final border pieces that you set aside together end-to end. Stitch them first to the side edges of your quilt. Then stitch to the top and bottom.
Back of your Quilt
You will either need make a pieced backing for your quilt or use extra-wide backing fabric. I chose to piece together some of the Anne Fabrics that didn't make it into the front of my quilt. I also used blocks from the Anne Panel, plus some strips of the Anne Swiss Dot - Red to make my fabrics wide enough. You may prefer a more whole fabric look for your quilt.

Finishing your Quilt
Finish your quilt according to your favorite method. I prefer basting with basting spray. I chose Nature-Fil™ Bamboo Blend Batting for the inside because it's really soft and gives the quilt a wonderful worn-in old-timey feel right from the start.

I quilted mine on my regular home sewing machine. My machine has a built-in even-feed feature, but if your machine doesn't have something like that, you'll want to use an even-feed or walking foot to help avoid puckers when quilting. I just quilted it simply, by using cream thread and quilting 1/4 inch to each side of the sashing seams.

Binding
Cut 8 - 3" strips from your binding fabric. (I used the Anne Stripes - Red because I liked the candy-cane look it gives the edge.) Sew your strips together end-to end. Iron in half the long way. Sew to the front your quilt with a 3/8 inch seam allowance, linking both raw edges of your folding binding up with the raw edges of your quilt. Fold the binding around to the back. Baste by pinning or gluing in place. Stitch-in-the-ditch from the front of your quilt through the binding seam to secure binding to the backing fabric.


Such a great design for this fabric. I love it!
ReplyDeleteFor a beginner quilt, why would you not cut full-size diamonds, press the seams firmly and top-stitch open bias tape or a long piece of sashing rather than the numerous cuts. It would make a beginner quilt even more simple for the starting quilter.
ReplyDeleteI did think of doing something along those lines, but ultimately it results in a lot of wasted fabric. (Or a lot of fabric turned into scraps...of course it can be used for something else.) The diamonds would have to be cut out side to side and there would be triangle shaped gaps between them with the same amount of fabric in them as for the diamonds. I was trying to use the fabric efficiently. And I liked the scale of the strips to diamond size which I think would be impractical for using bias tape or sashing in that way.
Delete