

Hello! I am SO excited to be share at Helping Little Hands today! I love all of the kid-friendly fun that Polly shares here, and I am thrilled to be sharing some of ours! My name is Rachel. I keep busy over at Sun Scholars, where I enjoy sharing with you all the things I love about being a mom.

Want to know more? Well, check out some of these fun activities included in my program. You can download a free week of the program, and purchase the entire kit on my blog, HERE. I hope to have you stop by!

Here is a sampling of some of the fun and easy projects you'll find in Rachel's Sun Scholars Summer Program...
Bird House Feeders

Time: 10+ mins
Supplies: Pine Cone or Wooden Bird House, Peanut Butter, String, Bird Seed
No matter what time of year, you can attract birds to your home with a simple bird feeder. Have your child create their own bird feeder and see what kinds of birds stop by for a snack. On your next outing to a park, make sure to grab a couple pine cones, or how about a wooden bird house! We found our bird house at Hobby Lobby on sale for $3.50.
How to Make a Bird Feeder
· Tie a string around your pine cone, giving yourself enough to allow you to hang it when it is complete.
· Fill a shallow bowl with bird seed.
· Using a butter knife, cover the pine cone in peanut butter (suet, vegetable shortening, or lard will also work).
· Roll the peanut-covered pine cone in bird seed until well covered.
· Your bird feeder is done! Be sure to hang it where you can see it.

Note: If you can, make a few bird feeders each with a different type of seed. What kind of birds will you attract to each bird feeder? You can extend this activity by keeping track of your bird visitors using THIS birdwatching worksheet!
this is from week 3 - Animal Fun, of the Sun Scholar Summer Program
Miniature Terrarium
Subjects: Science
Time: 10+ mins
Supplies: Small Jar, a variety of natural items, such as moss, pine cones, tree bark, seed pods, etc.

Have your child create their own miniature terrarium with items they collect on a nature hike. Take some time to explore the outdoors for items they can include in this project.


Creating a Miniature Terrarium
· Clean and dry your jar and lid.
· Spread out your collected items on the table in front of you.
· Place the moss in the lid.
· Have your child select other collected items and arrange them on top of the moss. You can “burry” the roots of small plants and flowers in the moss to encourage them to grow.
· Dampen the arrangement by sprinkling or spraying with water.
· Gently place the jar over top of the arrangement and screw into place.
· Find a safe place to keep your terrarium for all to enjoy.


Note: I found these great little jars (in the photos) at Michael's for $1 a piece. I thought they added some nice character, but you could just as easily grab something from your recycling bucket.


We didn't find any brightly colored berries to throw in this time, but the kids really enjoyed this project. From our picnic, nature hunt at the park, to the building of their terrariums. A great project for the kids!
Beach Bucket Cake
Subjects: Life Skills & Math
Time: 15+ mins
Supplies: Yellow Cake, Plastic Bucket (that holds 8-9 cups), Vanilla Pudding, Graham Crackers (1 cup crushed), Chocolate Shells, Plastic Shovel
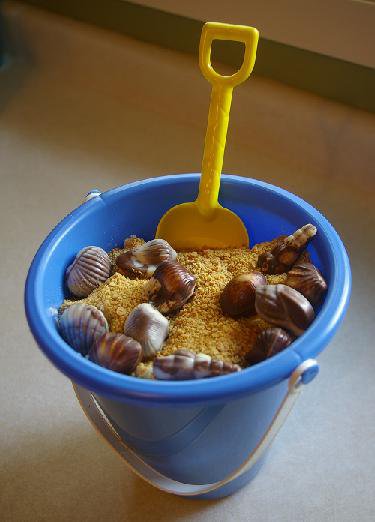
What a fun way to celebrate summer with your children! This cake in a bucket is SO easy to prepare, you can practically leave the kitchen to your child. This is sure to be a crowd pleaser!
Directions
1. Give your bucket and shovel a good wash before use.
2. Tear (or cut) the cake into 2” chunks. Place a layer of cake chunks in the bottom of the bucket.
3. Spread a layer of pudding over the cake chunks.
4. Repeat steps 2 and 3 until all the cake has been used, ending with a layer of pudding.
5. Sprinkle the crushed graham crackers over top to create the ‘sand’.
6. Add some chocolate shells (and perhaps a plastic crab?), your shovel, and dig in!
Tip: To crush your graham crackers, place them in a Ziploc bag and gently roll over them with a rolling pin until they look like sand.
this is from Week 6 - Beach Party of the Sun Scholar Summer Program
this is from Week 6 - Beach Party of the Sun Scholar Summer Program
Rocket Snack Packs

Subjects: Art
Time: 10+ mins
Supplies: Paper Tube (Toilet Paper Roll), Foil, Glue, Tissue Paper (red/orange/yellow), Scissors, Sharpie Marker, String or Ribbon, Snacks
1. 2.
2. 3.
3.
2. 3.
4. 5.
5.
 5.
5.
1. Glue a small piece of foil to cover one end of your tube.
2. Fringe the bottom ⅓ of a rectangle of tissue paper. Glue the top ⅓ around your tube.
3. Glue a rectangle of foil around your paper tube.
4. Create a triangle out of foil. Add glue to your triangle and lay your rocket on top.
5. Fill your rocket with candies or dry snacks.
6. To finish, tie a ribbon around the tissue fringe to close. Use a Sharpie to decorate.
this is from Week 9 - Space Explorers of the Sun Scholar Summer Program
Rubber Egg
Subjects: Science
Time: 5+ mins (with 1 week observation)
Supplies: Glass Cup or Jar, White Vinegar, Egg

Here is a scientific magic trick for your child to try with very interesting results!
Directions
· Place a raw egg into a tall glass cup. Have your child pour enough white vinegar into the cup to cover the egg. You will notice soon after that bubbles are forming on the shell of the egg.
· Set the egg aside. After 24 hours, carefully drain the vinegar from the cup, and again pour enough vinegar into the cup to cover the egg.
· This time, set aside where the egg will not be disturbed for 7 days. Do not touch it, but allow your child observe what is happening to the shell, or what is left of the shell at this point.
· After a week, carefully rinse the egg. Let your child hold it but be very gentle. What does it look like? How does it feel? Where did the shell go?
Want Some Answers?
Find the Rubber Egg Science sheet in the Printables section of this kit for the explanation of what is happening in this experiment.
this is from Week 11 - Hocus Pocus, of the Sun Scholar Summer Program

Polly, Congratulations to YOU and your beautiful baby! And.. thank you so much for having me here to share at Helping Little Hands today! I am honored!
ReplyDeleteI've seen bird feeders like this with pinecones, but never on a wooden bird house. What a great idea! Thank you, Rachel.
ReplyDelete