I've been wanting to go back and do a recap of some of my favorite Hand-Me-Down Rehab posts for a while. You know...because sometimes you see a project on someone's blog and you wonder how it really turned out for the long term...like after it was washed and worn once...or 10-20 times. I'm so glad Lorene from Just Lu has finally given me the motivation by being part of her Housewife MacGyver series. She has a great post in the series up today about substitutions.
So, since I have about a million things I need to be doing today besides blogging, I thought I'd repost this, in case anyone missed it.
We went to Seattle for the long weekend. We'd planned to drive back after church on Sunday and ended staying an extra night. Hubby and Little Brother went on Father/Son camp-out with Grandpa while the girls stayed home and watched Tangled. Then the rest of the weekend was full of just hanging out. We came home so exhausted that after putting the kids to bed around 7 pm, Hubby and I laid down to take naps...and didn't wake up until 11:30pm...so decided to just get up early this morning.
I really got into what I call Hand-Me-Down Rehab during the year just after Hubby graduated with his PhD. We were lucky to be able to substitute teach consistently, but Hubby didn't have a permanent job yet. We were pinching pennies as tight as we could. Buying new clothes was just not an option, so we got creative with what we had or could get on sale at the thrift store.
So here are a few of my favorite techniques.

Tuesday, May 31, 2011
Friday, May 27, 2011
Ham-BUG-ers and Buggy Dessert
A while back I guest posted on I'm guest blogging over at Homespun Threads today as part of her Summer Soiree - Summer Craft Camp for Kids.
We were eating hamburgers on homemade buns a couple nights ago and Little Brother asked why I didn't make them into bugs...it was that much fun. I thought I'd repost this here in case you missed it...and because I'm running around trying to get clothes washed and packed for a little weekend trip, and don't have time to post either of the projects I'm really excited to share with you...so check back for those. (I know, the suspense is killing you.
What better way to explore bugs, than eating some of your own Ham-BUG-ers.

We also love reading a lot of picture books, so this activity was inspired by a book. Beetle McGrady Eats Bugs by Megan McDonald. I wasn't quite brave enough to try some of the dishes in the book, but Ham-BUG-ers was an easy sell with the kids.

Thursday, May 26, 2011
Because this Could Be Your Son...
We all hate it when our kids have the sniffles, but we know they're going to get better and be as good as new in a few days. I can't imagine what it's like for you moms who have a child with a serious illness or a disease that might never go away and/or will have a lasting effect on your child.
One of my friends has a son name Jackson. He looks like a typical highschooler...and he is...he's a good student, involved in sports, great kid.
 He is also living with the effects of Histiocytosis. He's stable now and doing great, but he is dealing daily with the effects of his disease. The disease affects his fine and gross motor skills, has slowed his speech and has made school and sports much more difficult.
One of my friends has a son name Jackson. He looks like a typical highschooler...and he is...he's a good student, involved in sports, great kid.

Wednesday, May 25, 2011
Signed Mat w/ Faux Embroidery - Teacher Gift from the Whole Class
I've been trying to think of an end of year gift that Firecracker's Teacher would be able to enjoy for a long time without taking up too much room. I also wanted it to be something that could be from the whole class because I know that a lot of kids in her class don't have the money to buy teacher gifts and at 6 years-old don't always realize they could make one on their own.

I used the A+ Teacher Pattern from Twin Stitchers, but instead of embroidery, I used a fabric pen and crayons to make a "faux embroidery." My full tutorial for Faux Embroidery can be found here. It's really easy (and addictive!). This one took me about 30 minutes. Basically you trace your stitchery design onto muslin and color it in with crayons, but I've got more specific tips in my tutorial.

Here's what we came up with.


Monday, May 23, 2011
Meeting Ramona and Hanging with Henry
So it's no surprise around here that we love Ramona and Henry and pretty much every other Beverly Cleary book we've ever read...and I think we've read at least half of them now.

And Henry

And Ribsy.

So while we were in the Portland area for my sister's baby shower, we decided to go meet Ramona.


And Ribsy.

Friday, May 20, 2011
Best Boogie Wipers
...or snot rags...or nose wipers...mucus mops...or hankies...whatever you want to call them.


We've been using plenty of them lately. The kids just got over one cold when Sweet Pea's nose strarted running overtime again.
Wednesday, May 18, 2011
Glimpses
Little Brother is 3 1/2 and all boy. He LOVES to tease his sisters and call people "tootie bums" or "stinky underwear" which he has never heard anyone in our house say and came up with all on his own. Some days it makes me crazy.

So it's always nice when I catch glimpses that he is growing up and maturing and that there is a sweet and sensative boy in there underneath it all. One of those times was watching Little Brother get his Mother's Day present ready for his birthmom. I got some cute little faux embroidery fabric post cards made up for the kids to color with crayons...which Little Brother did his most thorough and careful coloring job on...ever.

Tuesday, May 17, 2011
A New Obsession
I have a new obsession. Have you seen Slovly? It's an art blog by artist Sabrina Vincent. I've spent several hours over the last few days looking back through her archives at all her sweet paintings. They're sweet, whimisical, and quirky all at the same time.
I'm not sure which ones I love the most...maybe the ones with books (there are lots of those)?


I'm not sure which ones I love the most...maybe the ones with books (there are lots of those)?
And I was definitely hooked when I saw this chemistry girl painting.
And this one called Mary and Rex is just so cute...
And I also love this one called Autumn.
See what I mean about sweet, whimsical, and quirky?
I could go on and on...but instead you should just go and check out her blog...but be prepared to spend an hour or two. She also has some really cute coloring pages like these mermaids, these sisters, or the whoopie kids. And I love the coloring pages found on her homeschooling blog here (you'll see the link to them in the top right corner.)
Monday, May 16, 2011
Fabric Mat
If you read my blog regularly, you know I've been kind of obsessed with faux embroidery (You can see my full faux embroidery tutorial here). I can't help it! The doodle people from Twin Stitchers are so cute...and it's fast and easy to personalize. So I'm at it again. I teach the 6 year-old (turning 7) class at church and wanted to have something for each of their birthdays. Of course it needed to be cheap and easy and something I could commit to giving to each of the six kids through the year.


So faux embroidery was the answer. I whipped up this cute little wall hanging using the girl from My Sister...My Friend, and the CTR sheild in the Tidbits All Occasions! pattern, both available from Twin Stitchers. One of the things I LOVE about Twin Stitchers patterns is that they're so easy to mix and match.
I did the words on my own and did my best to immitate the Twin Stitchers cute doodle writing.
Sunshine Circle Skirt...Again...
Okay, I know I'm not the only one who's had trouble with blogger last week. It deleted my last post about the Sunshine Circle Skirt I made for Firecracker...and I was more in the mood to work on some projects and get some yard work done rather than blog about them, so it's taken me a while to rewrite the post.


Anyway, I present you with...the Sunshine Circle Skirt. It's my new favorite skirt to make for my girls, so I'm sure I'll be making more. It takes a bit more fabric than other skirts since you cut it out in one complete circle rather than strips or sections, but I love how full and twirly it is.


Wednesday, May 11, 2011
Last one on the bandwagon...
So I'm probably the last person to have realized this was going on, but there is a Kids Clothes Week Challenge going on over at Elsie Marley right now. It just so happens that I've had a growing itch to sew some things for my kids...and I'd already been sewing for them Monday and Tuesday anyway, so it's easy to join in.
It's not too late for you to join in too.
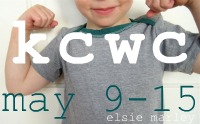
I don't have a full post ready, but here's a little teaser of my first project.
It's not too late for you to join in too.
I don't have a full post ready, but here's a little teaser of my first project.
Ellen Tebbits Moments
If you read my blog regularly, you know we're thoroughly obsessed with Beverly Cleary books lately. A month or so ago we read Ellen Tebbits by Beverly Cleary to Firecracker. She liked it, and was especially interested that Ellen and her friend Austine get to make brownies ALL BY THEMSELVES when they go to Austine's house.

So when one of Firecracker's friends came over last week, they made brownies...all by themselves.

Tuesday, May 10, 2011
Sweet 16 T-Shirt
When Hubby's mom and sister came out for a visit a few weeks ago, they wanted some help making a Sweet 16 T-shirt for Hubby's youngest sister.

We browsed through a lot of options online and came up with this. We did it using freezer paper stenciling. Freezer paper stenciling is so quick and easy, choosing a pattern is the hardest part.

His sister loved it. Happy Birthday, Kaylee!


Monday, May 9, 2011
Big Sister Burp Cloths
One of my sisters just had her third baby and is also a special needs foster mom to Andie whose a teenager. Andie is bonding with the baby more than anyone expected and loves to help hold her.

My sister's babies have also all been very spitty, so I told her her I'd make her some burp cloths. As I was looking through the flannel I had, I thought I'd try an experiment.


Sunday, May 8, 2011
OTHER Mothers
...I'm thinking of you.


I'm so glad they're a part of my life and my kids' lives.


I'm thinking of all you foster moms...
And single moms...
And moms who have angel babies waiting for you in Heaven...
Especially my kids' birthmoms...who gave me the ultimate gift...their most precious treasure...


I'm so glad they're a part of my life and my kids' lives.


I'm thinking of all you other birthmoms out there who get to see or hear from your child...
And I'm thinking of you birthmoms who wonder...where they are and who they've become...
I'm thinking of you who considered adoption and chose to single parent. And I wonder how that little baby is...

I'm thinking of all you foster moms...
And single moms...
And moms who have angel babies waiting for you in Heaven...
And all you who desperately want to be moms, but aren't yet...
And all you moms who love your children who struggle...
And all you moms who love your children who struggle...
Mother's Day used to be hard for me. Not just because I didn't have kids...but because I didn't know if I would ever have kids.
Seven years ago for Mother's Day Hubby and I told our parents that we had started paperwork to become approved for adoption. Six years ago, I celebrated my first Mother's Day as a mom.
I. AM. SO. BLESSED.
If Mother's Day is hard for you...I'm sending a hug...and thinking of you.
Saturday, May 7, 2011
Ham-BUG-ers
I'm guest blogging over at Homespun Threads today as part of her Summer Soiree - Summer Craft Camp for Kids.
Come find out how we make our Ham-BUG-ers and what book we read with it.

Come find out how we make our Ham-BUG-ers and what book we read with it.
Then be sure to check out all the other great ideas.

Thursday, May 5, 2011
Baby Life Quilt
Last week, I teased you all with some sneak peaks of this project. Did anyone guess that jumble of letters would turn into this?


I've realized I'm a pretty inconsistent gift giver. If I have an idea of something really fun to make, I'll go all out...otherwise, not so much. So my sister Maleena lucked out that I've had this quilt on the brain for a while. When I saw the idea on V & Co a while back, and loved it. She includes a template for the letters with her post or It's something a little different from the typical quilt, but SO easy.
Wednesday, May 4, 2011
Colored Freezer Paper Flower Pot Wrap - Great for Moms and Teachers!
As promised, I've got a fun and easy way to cover flower pots...a freezer paper wrap decorated by your child. These would be great to present a Mother's Day or Teacher Appreciation gift.

Add a coloring card and letter to the principal, and you've got a cute and easy personalized gift. (I have to say it was the nice letter that Firecracker's teacher mentioned in her email...not the flower wrap...so don't skip the letter!)

It's super easy. Here's what you'll need. I made a template to make a cover for a typical 4 in. flower pot here but you can easily make your own for a different size pot.


You don't really need the template, but it will help your child know where they can draw so that the picture isn't lost in the folds. Trace the template on two opposite edges of the paper side.

So that it should look like this. (Sorry the pencil lines are light...I didn't want them to show after she was done coloring.)

Have your child draw on it. Make sure they know which sides will end up being "up" when it goes on the pot. (We ended up with some upside down ones.)

Put your pot in the middle of the paper. Then put a little roll of tape in the middle of all for edges.

Fold up each of the four sides.


Then fold the extra paper around the edges so that your child's pictures show.


I figured that our main gift for Teacher Appreciation week would be a nice letter to Firecracker's principal about a couple of her teachers, but I wanted a small gift to go along with it. I took Firecracker down to the store and let her choose out a potted plant for each of the three teachers (classroom teacher, classroom aide, and computer teacher) that I wrote letters about. Then I realized that I needed to do something with the pot...something easy...and something to keep the pot from making everything that touched it dirty and damp.
That's when I decided to use freezer paper. The plasticy side keeps slight moisture in, and I had Firecracker color on the papery side.
Add a coloring card and letter to the principal, and you've got a cute and easy personalized gift. (I have to say it was the nice letter that Firecracker's teacher mentioned in her email...not the flower wrap...so don't skip the letter!)


Cut out a 9 inch square of freezer paper. Fold it in half with the papery side out.

You don't really need the template, but it will help your child know where they can draw so that the picture isn't lost in the folds. Trace the template on two opposite edges of the paper side.

So that it should look like this. (Sorry the pencil lines are light...I didn't want them to show after she was done coloring.)

Have your child draw on it. Make sure they know which sides will end up being "up" when it goes on the pot. (We ended up with some upside down ones.)

Put your pot in the middle of the paper. Then put a little roll of tape in the middle of all for edges.

Fold up each of the four sides.


Then fold the extra paper around the edges so that your child's pictures show.

Tape securely, and trim.

That's it!


For the card, I found the image from here and just whipped up a card in Word. If you like mine, you can download it here.
Subscribe to:
Posts (Atom)